Stripo API Reference
Developer Guide
- General Background
- Logic Description
- SRT Transformers
- Getting Started
- REST API Info
- Overview
- API Endpoint
- Authentication
- Response Codes
- Methods
- Check the API key
- Generate email
- Save new SRT rule
- Get list of all SRT rules
- Get configuration for particular SRT rule
- Delete particular SRT rule
- Export email to eSputnik
- Export email to HTML file
- Export template to HTML file
- Get emails call
- Get templates call
- Get template folders
- Get email folders
- Delete email
- Delete template
- Appendix A. The set of supported transformers
- Appendix B. Supported conditional rules for SRT configuration
- Appendix C. Supported data sources config
General Background
Logic Description
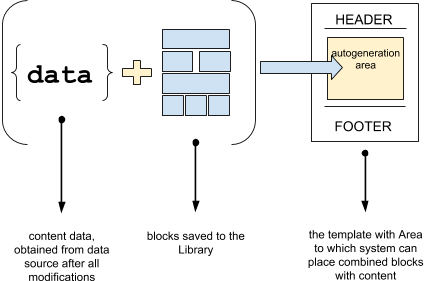
The Stripo API provides an ability to auto-generate emails using an external data source (which is the source for getting the content) and already configured and saved modules to the Library (which define the design and layout of end email).
As a result of the transformations, the data connected to the modules is placed in special zones of the templates (called auto-generated zones), prepared in advance. The output is an email made in the style of a selected template and the units stored in the library.
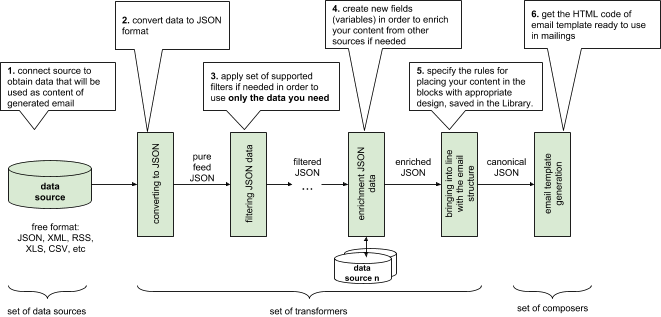
In general overview, the emails creation process has the following steps as displayed on the image below:
Steps clarification
-
Define the external sources where the system can get the content data from. It can be the raw string with text or link to the data source, from which we can retrieve content data.
As the system uses only JSON format of the data, it is necessary to convert the data from the data source to JSON format.
In case the raw data source is connected and needs to be filtered or modified prior to an email template generation, it is possible to apply any of the supported transformers, as described in Appendix A.
It is also possible to define the rules for creating and filling in new variables for every content unit.
Example 1. Your main data source doesn’t have necessary (like compain_description) info but has the key (like compaign_id) that can be used to obtain needed info from the other source. To do this, simply connect that source into the query and define rules of how the system should find the campaign_description using camplain_id.
Example 2. If you don’t have an URL for every product, but have only the ids of products and know how the URL can be created, you can create a new variable and define a rule like this: URL=”yoursite.com/+’ids’”.
SRT transformer (from the words start-repeatable-tail). This is the place where you define the way your content should appear in the generated email. More about this you can read here.
At the very end, in case your query has been successfully processed, you will get the auto-generated email template with the content and modules specified in the input parameters.
SRT Transformers
This is one of the most important transformers, which defines the rules for placing modules in your email.
The great thing is that you can vary the set of modules depending on any of parameters you received from the data source. This helps to create complicated rules.
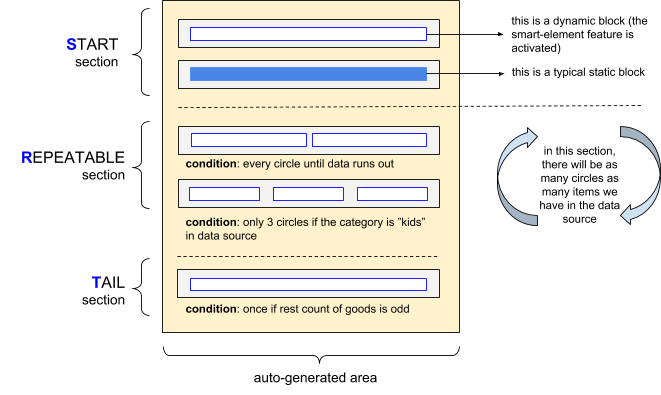
It is divided into 3 sections:
-
Start section — here you can define which modules should be placed at the very beginning of the auto-generated area.
-
Repeatable section — here you can set a rule of what modules should be used for each loop (circle). This is very helpful in case you want to alternate different modules or use some specific modules on every X circle.
-
Tail section — this is the place where you can set a rule for displaying particular module in case if there is no enough items (products) in your data source to complete the whole circle from a repeatable area.
Here is a short example of using SRT transformer. Let's say you would like to place at the very beginning of auto-generated area of email the modules as follows:
the module with big banner depending on user’s preferences, then
the module with big static banner (regardless user’s preferences), then
the module with two containers underneath for all rest items (products), then
the module with three containers in 1 line on the 3rd circle of the repeatable section with products for children in case if there is “kids” category in the data source, after that
the last module should be also a big banner in case there is an odd number of products remained.
The general view of modules layout will be like in the image below.
As in practice, the chosen order of modules probably will be the same for some of your other emails; we have an option to operate with the SRT rules via REST methods (like save/reuse and delete them). So, after you configured and saved your SRT rules, it is possible to reuse them again — simply call them by name and set a few config params needed for applying in your particular email template.
More info about how to operate the SRT rules and supported rules you can find in the REST API Methods description.
Getting Started
There are a few steps how to start an email generation automatically using Stripo API:
Get a JWT token for authentication of all REST API calls. Find more about this here.
Save needed modules to the Library, which will be used for the email generation. Read more about how to save modules to Library on our blog.
Create an auto-generation area within the desired template for the email generation.
The most tricky and probably the easiest item is the last one. Please, choose the template for your auto-generation emails. This template should be yours (saved in the project you have access to), not the basic or public. Basically, it may have some static elements like Header and Footer, etc. AND it should have at least one stripe with a special class, needed to determine the place where exactly the content should be inserted in when the Generate Email method is called.
For this purpose, please add an empty stripe with one column and add the esd-email-gen-area="name_of_area" class to the td tag of the stripe in the code editor where the name_of_area is the given name.
Example of the stripe with area for email auto-generation, called products-area
<td class="esd-stripe" align="center" esd-email-gen-area="products-area">As soon you’ve made all steps above, you’re ready to start generating your emails via REST API.
Don’t hesitate to email us at support@stripo.email in case you have any questions regarding Stripo REST API or need any help with configuration.
REST API Info
Overview
The Stripo API is a standard REST API that supports basic CRUD operations and may be used by the 3rd party applications to automate the email templates creation and planning their further exports and mailings.
Every POST request MUST HAVE Content-Type header. Currently, we accept only 'application/json' content-type.
Authentication works by checking a user's access token that can be generated within Stripo account on the Project settings page by its owner. This limits the ability to influence the emails and templates of projects outside the organization for which access token has been generated.
The data request is passed to the API by POSTing JSON objects to the API endpoints with the appropriate parameters. The documentation for each API call will contain more details on the parameters accepted by the call.
API Endpoint
All API URLs listed in this documentation are relative to https://stripo.email/emailgeneration/v1/. For example, the /email call is reachable at https://stripo.email/emailgeneration/v1/email.
Authentication
All API calls require authentication. This is essential for the API to identify which user is making the call so that appropriate results will be returned, as well as for the security reasons.
Authentication is achieved through the use of the JWT token. This is a unique key for each project in our system. You may find your API JWT token or generate a new one in the respective section on the Project settings page. Please keep your JWT token safe to prevent any unauthorized access.
Once you obtain your JWT token, you will have to use it in every API call you make. The token value must always be specified in a header in every query as shown in the example below:
Stripo-Api-Auth: YOUR_JWT_TOKENResponse Codes
Methods
Please, click on particular method's name in order to read more information about its implementation.
Every POST request MUST HAVE Content-Type header. Currently, we accept only 'application/json' content-type.
{templateId}
Check the API key call
The method provides an ability to check if the given JWT token key is valid and if you have an access to perform any of API calls.
In case your JWT token is valid you’ll get the version number of API and the flag that the token is valid.
TokenValidationDto entity
{
   valid: Boolean,
   version: String,
   protocolVersion: String
}
The description of fields:
Generate Email call
The method allows generating an email template automatically with content received from an external data source using modules already saved to the Library. In this query, it is possible to operate the set of transformers that may filter or edit the received data in order to get the final actual version needed to be used in your mailings (e.g., use only today’s data or the data for women, etc.).
Please note, among the input parameters you should specify the templateId, which will be used for email generation. This template should have at least one auto-generation area into which the combined content with modules will be placed according to the predefined rules.
Now let’s take a look at more details in the body of the request
EmailGenParamsDto entity
{
   dataSources: DataSourceDto[],
   transformers: TransformerDto[],
   composers: ComposerDto[],
   templateId: Long,
   emailId: Long,
   emailName: String,
   title: String,
   preheader: String
}
The description of the fields:
The sources of the data, that should be used for email template generation.
DataSourceDto description
{
       name: String, //M
       type: String, //M
       value: Object //M
    }
where:
name — any name of the data source;
type — currently we do support 2 types:
- RAW — in this case, the data should be placed directly in the value field;
- LINK — the data will be loaded from the specified URL in the value field;
value — the data of the source or the URL.
Read more about the data source formats with examples in Appendix C.
The list of transformers that may be applied to the initial data to generate an email.
TransformerDto description
{
       type: String,  //M
       source: String, //O
       outputSource: String, //O
       config: JSON //M
    }
where:
type — the type of transformers. Read more about supported transformer types in Appendix A;
source — optional field, the name of the source to which this transformer should be applied. If it is not specified, the first one will be used;
outputSource — optional field, the name of the destination source where the converted data will be written after its modification by this transformer. If it’s not specified then results will be written to the initial source;
config — the configuration of the transformer. Each transformer has own format of configuration. Read more about supported transformers in Appendix A.
The list of composers used for mapping the data from the data source with appropriate template area within email template.
ComposerDto description
{
       type: String, //O
       source: String, //O
       templateArea: String //O
    }
where:
type — an optional field, this is the type of a composer. There are only 2 supported types: “canonical” (used by default) and “plain”.
The “canonical” is used to match the data and the template's auto-generation area when the data source is the canonical JSON.
The “plain” is used to match the data and the auto-generation area of the template when the data source is a plain text that needs to be imported the way it is without any modifications.
source — an optional field, the name of the source from which the data should be taken and applied to template area defined below. If it’s not specified then the data will be taken from the first source;
templateArea — an optional field. This is the zone identifier in the template where to insert the records. If it’s not specified then the first found zone is used.
This is an ID of a template with the auto-generated area. This template will be used for an email generation. Please note that this template should be yours (saved in the project you have access to), not a basic or a public one.
To view all your templates please go to the Templates menu within Stripo account.
In case you want to override an already existing email template, please specify its ID here. If this field is empty than a new email will be created.
This is the name that will be given to a generated email.
If the field is empty then the name of a template will be used as a name of the generated email.
Please note!
Definition of fields: M — mandatory, O — optional;
You should not send optional field in the request if you want to keep them empty.
Example of body request
{
  "templateId": 1012,
  "emailId": 4406,
  "emailName": "Test email",
  "title": "This is title",
  "preheader": "this is preheader",
  "dataSources": [
    {
      "name": "mk_campaigns",
      "type": "LINK",
      "value": "https://someemail.com/client-api/v1.4/campaign/?marketing=true"
    }
  ],
  "transformers": [
    {
      "type": "date_condition",
      "config": {
        "format":"yyyy-MM-dd'T'HH:mm:ss",
        "field": "startUtcTime",
        "rules": [
          {
            "condition": "EQUALS",
            "value": "TODAY",
            "minutesToAdd": 240
          }
        ]
      }
    },
    {
      "type": "trim",
      "config": {
        "offset": 0,
        "limit": 20
      }
    },
    {
      "type": "values_mapper",
      "config": {
        "rules": [
          {
            "fieldName": "p_description",
            "value": "${description}"
          },
          {
            "fieldName": "url",
            "value": "https://someemail.com/campaign/${codeName}"
          }
        ]
      }
    },
    {
      "type": "srt",
      "config": {
        "name": "mk_srt"     //This is the name of the SRT rule
      }
    }
  ],
  "composers": [
    {
      "type": "canonical",
      "source": "mk_campaigns",
      "templateArea": "products-area"
    }
  ]
}
In case the request has been processed successfully, in the body of response you will get the emailId.
EmailDto entity
{
   emailId: Long,
   name: String,
   editorUrl: String,   //This is the URL for editing this email in Stripo editor
   previewUrl: String   //This is the preview URL of the generated email you can share
   updatedTime: String,  // data format yyyy-MM-dd’T’HH:mm:ss.SSSXXX
   hasAmp: Boolean,  //This parameter indicates is there AMP content or not
   preheader: String,  //This is hidden preheader of email
   title: String  //This is a title of the email
}
Save new SRT rule call
This method allows saving new SRT rule with a given name for further re-use in email generation method.
SrtConfigDto entity
{
   name: String,
   config: JSON
}
The description of the fields:
The name of the SRT rule.
The configuration body of a transformer which has the format described below.
{
  start: [
    {
      id: String
    }
  ],
  repeatable: [
    {
      id: String,
      rules: {
        enum
      }
    }
  ],
  tail: [
    {
      id: String
    }
  ]
}
where:
start, repeatable, tail — these are the names of the sections where the rules for a module layout should be set;
id — the UID of the module saved to the Library;
rules — the name of the conditional rule applied to the particular module. The list of supported conditional rules may be found in Appendix B.
It is possible to set skipValue:true parameter for any module in case you don’t need to apply content to it.
Example of SRT config field.
{
  "start": [
    {
      "id": "structure-smart-100"  // UID of the smart-element (module) saved to the Library
    },
    {
      "id": "structure-simple-30-30-30", // If the element from the library of modules is a structure, then in the "content" section, the rules are defined separately for each container
      "content": [
        {
          "id": "product-card"
        },
        {
          "id": "banner-block",
          "skipValue": true // Says that the data does not need to be applied to the current element
        },
        {
          "id": "product-card"
        }
      ]
    }
  ],
  "repeatable": [
    {
      "id": "structure-smart-100",
      "rules": {  // Section to describe the rules for applying this element from the library of modules
        "only": 1
      }
    },
    {
      "id": "banner2-100",
      "skipValue": true,
      "rules": {
        "only": 4
      }
    },
    {
      "id": "structure-simple-50-50",
      "content": [
        {
          "id": "product-card"
        },
        {
          "id": "product-card"
        }
      ],
      "rules": {
        "start": 2
      }
    }
  ],
  "tail": [
    {
      "id": "tail-banner-100",
      "skipValue": true
    },
    {
      "choice": [  //  Section to describe the selection of the desired item. The first element from the list which has all the rules will be used
        {
          "id": "structure-simple-50-tail",
          "content": [
            {
              "id": "product-card"
            },
            {
              "id": "product-card"
            }
          ],
          "rules": {
            "records": 2
          }
        },
        {
          "id": "structure-smart-100-tail",
          "mapping": {  // Section to describe the comparisons of the values from an array of the data to those that are in the module
            "p_big_image": "p_image" // If there is the "p_big_image" key in the data array, then add its value to the key p_image
          },
          "rules": {
            "records": 1
          }
        }
      ]
    }
  ]
}
In case the request has been processed successfully you will get the 200-OK response code with an empty body.
Get list of all SRT rules call
This method allows getting the list of all saved SRT rules for the project. In response, the array with all SRT rules’ names will be returned.
GetSrtConfigNamesDto entity
[
  {
   name: String
  }
]
Get configuration for a particular SRT rule call
This method allows receiving the configuration for already saved SRT rule. In the GET parameter, it is required to specify the name of a needed one.
As a result, you will see the SrtConfigDto entity described in the Save new SRT rule method.
Delete particular SRT rule call
This method allows deleting the already saved SRT rule. In the GET parameter, it is required to specify the name of a needed one.
In case the request has been processed successfully you will get the 200-OK response code with an empty body.
Export email to eSputnik call
This method allows exporting any email from a user’s project to the eSputnik ESP for further mailings. Before calling this method, please make sure that the corresponding eSputnik account is connected to the user’s Stripo project where the email is saved.
In the body of the request, the ExportParamsDto entity should be passed.
ExportParamsDto entinty
{
   emailId: Long,
   subject: String,
   from: String,
   tags: String[],
   accountEmail: String
}
The description of fields:
This is an email ID needed to be exported to eSputnik.
This is the subject line of an exported email. Will be also used to set the name of a template in the eSputnik account.
Sender name (must match one of the existing sender names in the eSputnik system). The format of the sender name: "string".
List of tags to be assigned to the message.
This is an email address linked to the eSputnik user’s account which the email should be exported to.
Example of body request
{
   "emailId": 10015,
   "subject": "The Subject Line",
   "from": "My Company name",
   "tags": ["tag1","tag2"],
   "accountEmail": "test@test.com"
}
In case the request has been processed successfully, in the body of response you will get the emailId.
ExportOutputDto entity
{
   emailId: Long
}
Export email to HTML file call
This method allows exporting any email from a user’s project to the HTML file for further mailings. In the GET parameter, it is required to specify the ID of email that should be exported.
The description of supported Query parameters for this call:
In case the request has been processed successfully you will get the 200-OK response code with application/octet-stream of HTML file in the body.
Export template to HTML file call
This method allows exporting any template from a user’s project to the HTML file for further mailings. In the GET parameter, it is required to specify the ID of the template that should be exported.
The description of supported Query parameters for this call:
In case the request has been processed successfully you will get the 200-OK response code with application/octet-stream of HTML file in the body.
Get emails call
This method returns the list of created emails from a user’s project. It is possible to apply the Query Strings according to the table below in order to filter data in a certain order.
The description of supported Query parameters for this call:
ENUM
This field can take one of the allowed values and helps to define the way how the data should be sorted in the response:
folderId — by folder ID,
createdTime — by creation date,
updatedAt — by the date and time when the email has been updated most recently,
name — by the given name of email,
userId — by the userId of a customer who created this email.
This parameter refers to Ascending sorting direction (true). Ascending means smallest to largest, 0 to 9, and/or A to Z and Descending means largest to smallest, 9 to 0, and/or Z to A. Ascending order means the smallest or first or earliest in the order will appear at the top of the list: For numbers, the sort is smallest to largest.
If you apply false value the reverse order descending (Z to A, 9 to 0) will be applied.
As a result, you will see the EmailDto entity described in the Generate email method.
Get templates call
This method returns the list of created templates from a user’s project. It is possible to apply the GET parameters according to the table below in order to filter data in a certain order.
The description of supported Query parameters for this call:
ENUM
This field can take one of the allowed values and helps to define the way how the data should be sorted in the response:
folderId — by folder ID,
createdTime — by creation date,
updatedAt — by the date and time when the email has been updated most recently,
id — he unique ID of templatel.
This parameter refers to Ascending sorting direction (true). Ascending means smallest to largest, 0 to 9, and/or A to Z and Descending means largest to smallest, 9 to 0, and/or Z to A. Ascending order means the smallest or first or earliest in the order will appear at the top of the list: For numbers, the sort is smallest to largest.
If you apply false value the reverse order descending (Z to A, 9 to 0) will be applied.
As a result, you will see the TemplateDto entity described below.
TemplateDto entity
{
   templateId: Long,
   name: String,
   folderId: Long,  //Unique ID of a folder in which this template is stored
   editorUrl: String, //This is the URL for editing this template in Stripo editor
   previewUrl: String,  //This is the preview URL of the template you can share
   updatedTime: String,  // data format yyyy-MM-dd’T’HH:mm:ss.SSSXXX
    hasAmp: Boolean,  //This parameter indicates is there AMP content or not
   preheader: String,  //This is hidden preheader of template
   title: String  //This is a title of the template
}
Get Template Folders call
This method returns the list of created folders within Templates menu from a user’s project.
As a result, you will see the FolderDto entity described below.
{
   id: Long, //Unique ID of a folder in which this template is stored
   name: String, //The name of the folder
   type: String, //The type of the folder. Can be only "EMAIL" or "TEMPLATE" depending on the menu in which the folder has been created
   treeRef: String, //Unique ID of a folder in which this particular folder is located. In case if this is a root folder then this parameter has the same value as "id" parameter above
}
Get Email Folders call
This method returns the list of created folders within Email Messages menu from a user’s project.
As a result, you will see the FolderDto entity described above.
Delete email call
This method allows deleting already created email in the user’s project. In the endpoint URL, it is required to specify the ID of email that should be removed.
In case the request has been processed successfully you will get the 200-OK response code with an empty body.
Delete template call
This method allows deleting already created template in the user’s project. In the endpoint URL, it is required to specify the ID of template that should be removed.
In case the request has been processed successfully you will get the 200-OK response code with an empty body.
Appendix A. The set of supported transformers
Convert XML to JSON
This transforms the data source format from XML to JSON.
{
   "type": "xml_json",                   // Transformer type
   "source": "sourсe1",                  // Optional. The name of the data source. If it’s empty then the very first one will be used
   "outputSource": "source2"             // Optional. The name of the destination source where the converted data will be written after its modification. If it’s not specified then results will be written in the initial source
}
Search for JSON element by selector
This transformer helps to find any element in the JSON structure by selectors, and create the array with the found elements. This is useful in case you want to use only some pieces of the data nested deep in JSON structure for one of your variables.
{
   "type": "json_path",                  // Transformer type
   "source": "sourсe1",                  // Optional. The name of the data source. If it’s empty then the very first one will be used
   "config": {
      "rules": [                         // The set of the filtering rules
         {
            "outputSource": "source2",   // The name of the destination source where the converted data will be written after its modification. If it’s not specified then results will be written in the initial source
            "path": "$..gender[?(@.code == 'F')]..type"   // Selector. Determines the position of the desired elements in the JSON object
         }
      ]
   }
}
Rules for the formation of selectors may be found here https://github.com/json-path/JsonPath.
Filtering data
by date
{
   "type": "date_condition",             // Transformer type
   "source": "sourсe1",                  // Optional. The name of the data source. If it’s empty then the very first one will be used
   "outputSource": "source2",            // Optional.The name of the destination source where the converted data will be written after its modification. If it’s not specified then results will be written in the initial source
   "config": {
     "format":"yyyy-MM-dd'T'HH:mm:ss",   // The date format in the data source
     "field": "fieldName",               // The name of the field by which filtering will be performed
     "filterType": "AND",                // Optional. Shows how to apply a combination of the filtering rules. Variants: "AND", "OR". The default is "AND"
     "rules": [                          // The set of the filtering rules
       {
         "condition": "EQUALS",          // The filtering rule. Variants: "GREATER", "GREATER_EQUALS", "EQUALS", "NOT_EQUALS", "LESS", "LESS_EQUALS"
         "value": "2017-12-16T04:00:00", // The value of the filter. Instead of the absolute value, you can insert the word "TODAY" — then the date "today" will be used. Time is taken in the UTC zone
         "daysToAdd": 1,                 // Optional. The number of days to add to the filter value
         "minutesToAdd": 240             // Optional. The number of minutes to add to the filter value
       }
     ]
   }
}
by text with constant value
{
   "type": "string_condition",           // Transformer type
   "source": "sourсe1",                  // Optional. The name of the data source. If it’s empty then the very first one will be used
   "outputSource": "sourсe2",            // Optional. The name of the destination source where the converted data will be written after its modification. If it’s not specified then results will be written in the initial source
   "config": {
      "field": "fieldName",              // The name of the field by which filtering will be performed.
      "filterType": "AND",               // Optional. Shows how to apply a combination of the filtering rules. Variants: "AND", "OR". The default is "AND"
      "rules": [                         // The set of the filtering rules
         {
            "condition": "CONTAINS",     // The filtering rule. Variants: "GREATER", "GREATER_EQUALS", "EQUALS", "NOT_EQUALS", "LESS", "LESS_EQUALS"
            "value": "filterValue"       // The value of the filter
         }
      ]
   }
}
by text with dynamic value taken from other data source
{
   "type": "string_condition",           // Transformer type
   "source": "sourсe1",                  // Optional. The name of the data source. If it’s empty then the very first one will be used
   "outputSource": "sourсe2",            // Optional. The name of the destination source where the converted data will be written after its modification. If it’s not specified then results will be written in the initial source
   "config": {
      "field": "fieldName",              // The name of the field by which filtering will be performed.
      "filterType": "AND",               // Optional. Shows how to apply a combination of filter rules. Variants: "AND", "OR". The default is "AND"
      "rules": [                         // The set of the filtering rules
         {
            "condition": "CONTAINS",     // The filtering rule. Variants: "GREATER", "GREATER_EQUALS", "EQUALS", "NOT_EQUALS", "LESS", "LESS_EQUALS"
            "sourceValue": {             // Section for describing the value of a filter that is taken from another source.
               "source": "source3",      // The name of the data source
               "field": "brands",        // The name of the field by which filtering will be performed
               "strict": false,          // Optional. Specifies how to proceed if there is no data in the source for the filter value. "true" — to exclude the data, "false" — to leave the data. The default is "false".
               "filterType": "OR"        // Optional. If the value of the filter is an array of strings, it shows how to apply the filtering rules. Variants: "AND" — a clear match, "OR" — at least 1 match from the array. The default is "AND"
            }
         }
      ]
   }
}
Joining data
{
   "type": "join_sources",               // Transformer type
   "outputSource": "source2",            // Optional. The name of the destination source where the converted data will be written after its modification. If it’s not specified then results will be written in the initial source
   "config": {
      "sources": [                       // Set of the names of the data sources to be joined
         "source1",
         "source2",
         "source3"
      ]
     "unique": "false",                  // Optional. Set the "true" value in case you need to leave only unique data. The default is "false"
   }
}
Trimming data
{
   "type": "trim",                      // Transformer type
   "source": "sourсe1",                 // Optional. The name of the data source. If it’s empty then the very first one will be used
   "outputSource": "source2",          // Optional.The name of the destination source where the converted data will be written after its modification. If it not specified then results will be written in the initial source
   "config": {
      "offset": 2,                     // Optional. The offset relative to the first element. The default is "0"
      "limit": 3                       // Optional. The number of items to leave. If it’s empty then all items are used by default
   }
}
Adding new fields to data source
{
   "type": "values_mapper",             // Transformer type
   "source": "sourсe1",                 // Optional. The name of the data source. If it’s empty then the very first one will be used
   "outputSource": "source2",           // Optional. The name of the destination source where the converted data will be written after its modification. If it’s not specified then results will be written in the initial source
   "config": {
      "rules": [                        // A set of rules for adding new fields
         {
            "fieldName": "newFieldName",                    // Name of the new field to add
            "value": "text ${someField} ${dealCategory}",    // The value of the field. If you want to take the value of an existing variable, it turns into $ {...}
            "valuePatterns": [                              // Optional. A section that allows creating additional variables to form a value
               {
                  "name": "dealCategory",                   // The name of the additional temporary variable
                  "path": "categories.category[0].content"  // The selector is the path by which you can get the value for the variable. Rules for the formation of selectors may be found here https://github.com/json-path/JsonPath.

            ]
         }
      ]
   }
}
Sorting data
by fixed (constant) value
{
   "type": "sorting",                   // Transformer type
   "source": "sourсe1",                 // Optional. The name of the data source. If it’s empty then the very first one will be used
   "outputSource": "source2",           // Optional. The name of the destination source where the converted data will be written after its modification. If it’s not specified then results will be written in the initial source
   "config": {
      "field": "fieldName",             // The name of the field by which the sort will occur
      "value": [                        // The array of values to sort by
         "b1", "b2"
      ]
   }
}
by dynamic value taken from other data source
{
   "type": "sorting",                   // Transformer type
   "source": "sourсe1",                 // Optional. The name of the data source. If it’s empty then the very first one will be used
   "outputSource": "source2",           // Optional. The name of the destination source where the converted data will be written after its modification. If it’s not specified then results will be written in the initial source
   "config": {
      "field": "fieldName",             // The name of the field by which sorting will occur
      "sourceValue": {                  // Section for describing the value of a filter that is taken from another source
         "source": "source3",           // The name of the data source.
         "field": "brands"              // The name of the field which to take the value for the filter from
      }
   }
}
SRT
The format of this transformer is as described below:
{
   "type": "srt",                       // Transformer type
   "source": "sourсe1",                 // Optional. The name of the data source. If it’s empty then the very first one will be used
   "outputSource": "source2",           // Optional. The name of the destination source
   "config": {
      "name": "some_config",            // The name of the SRT rules stored in the database. See the REST API Methods description to find out how to create the SRT rule with configs
   }
}
Appendix B. Supported conditional rules for SRT configuration
Use only on particular loop (circle)
{
   "rules": {
      "only": 2                     // The loop number
   }
}
Use only on a loop (circle) that is a multiple of a certain value
{
   "rules": {
      "every": 3                     // The loop number
   }
}
Use only starting from a certain loop (circle)
{
   "rules": {
      "start": 4                     // The loop number
   }
}
Use only until certain loop (circle)
{
   "rules": {
      "end": 4                     // The loop number
   }
}
Use only for even loops (circles)
{
   "rules": {
      "row": "even"
   }
}
Use only for odd loops (circles)
{
   "rules": {
      "row": "odd"
   }
}
Use only if there is any data in a certain field
{
   "rules": {
      "hasValues": [
         "p_old_price"              // The name of the field that should be checked
      ]
   }
}
Use only if there is non-empty value for "p_old_price" field
{
    "rules": {
        "hasConditionalValues": [
            {
                "key": "p_old_price",      // The name of the field that should be checked
                "skipEmptyValues": true    // True, if empty field values should be skipped
            }
        ]
    }
}
Use only if there is a specific value for "p_old_price" field
{
    "rules": {
        "hasConditionalValues": [
             {
                "key": "p_old_price",
                "value": "123"              // Exact value of the field that should be checked
             }
        ]
    }
}
Use only if there are X records left in the data array
{
   "rules": {
      "records": 2                  // The quantity of the records left in the array
   }
}
Use only if the total number of records is even
{
   "rules": {
      "totalRecords": "even"
   }
}
Use only if the total number of records is odd
{
   "rules": {
      "totalRecords": "odd"
   }
}
Appendix C. Supported data sources config
Format of supported data sources configurations
"dataSources": [
   {
      "name": "source1",          // The given name of the source
      "type": "LINK",             // The type of the data source. It can give only two values: “LINK” and “RAW”
      "value": "http://someurl.com/some_address/"   // The URL where the data will be taken from
   },
   {
      "name": "source2",
      "type": "RAW",
      "value": [                  // The data is immediately transmitted in this field
         {
            "someField": "value1"
         },
         {
            "someField": "value2"
         }
      ]
   },
   {
      "name": "source3",           // An example of the data set where values for filtering only will be taken from. Please, refer to Appendix A for checking “filtering” transformer
      "type": "RAW",
      "value": {
        "filterByNameValues": [
          "name1",                 // Some values by which filtering should be performed
          "name2"
        ],
        "filterByTypeValues": [
          "C", "M"                 // Some values by which filtering should be performed
        ]
      }
   }
]