Lisez cet article pour connaître tous les rouages de la conception d'emails derrière les emails de masse via Gmail.
Dans cet article, je vais vous montrer deux façons d'envoyer des e-mails en masse dans Gmail.
Mais auparavant, vous devez les exporter de Stripo vers le client de messagerie sélectionné, si vous prévoyez d'envoyer des e-mails HTML.
Comment exporter des e-mails de Stripo vers Gmail
Vous pouvez le faire en quelques clics:
- cliquez sur le bouton "Exporter" au-dessus de la zone de modèle;
- dans la fenêtre contextuelle, choisissez Gmail;
- entrez vos identifiants Gmail;
- trouvez votre e-mail dans le dossier Brouillons du client de messagerie sélectionné.
Remarque:
Ce faisant, vous nous autorisez uniquement à accéder à votre dossier Brouillons. Nous n'aurons pas accès à vos contacts ou à tout autre dossier de messagerie dans Gmail. Pour garantir que votre compte Gmail et toutes les données qu'il contient sont en sécurité avec nous, nous avons passé et réussi le test de sécurité Bishop Fox.
Pour plus d'informations sur la façon d'exporter des e-mails vers Gmail, veuillez consulter notre vidéo:

Il existe donc deux façons d'envoyer des e-mails en masse via Gmail.
Méthode 1. E-mails de masse Gmail
Avant de commencer mes propres enquêtes sur ce sujet, je ne savais pas qu'il était techniquement possible d'envoyer des e-mails en masse dans Gmail.
Alors, comment faire?
Certes, vous devez créer un groupe.
Pour ce faire, vous devez:
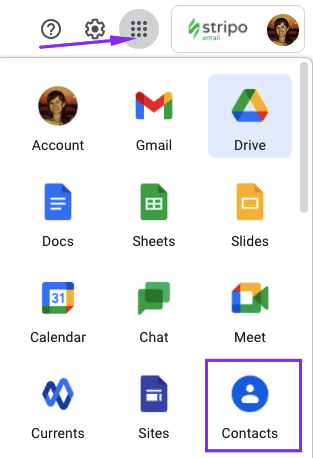
- cliquer sur le bouton "Applications Google" directement dans votre compte Gmail;
- entrer dans l'onglet "Contacts";
-
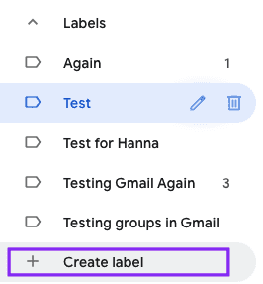
créer une étiquette / nom de groupe en cliquant sur "Créer une étiquette" et lui donner un nom;
-
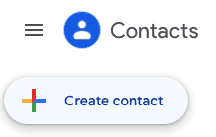
cliquer ensuite sur le bouton « Créer un contact »;
-
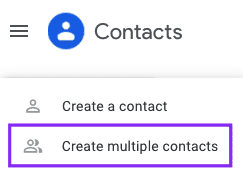
choisir ensuite l’option "Créer des contacts multiples";
-
saisir toutes les adresses e-mail nécessaires avec des virgules, ou télécharger simplement votre fichier CSV pour ajouter des contacts à un groupe;
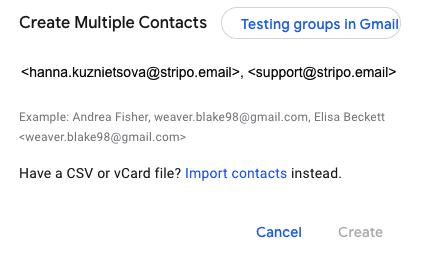
- appuyer sur le bouton "Entrée" de votre clavier pour activer le bouton "Créer" ";
- C’est fait! Tous les contacts que vous venez de saisir ont été ajoutés au groupe.
Vous voudrez peut-être vérifier si tous les contacts ont été ajoutés correctement. Entrez simplement le segment dans la section "Libellé".

Si vous téléchargez un fichier CSV avec le numéro de téléphone, le nom et l'intitulé du poste du contact, ces données apparaîtront également dans le groupe.
Important:
Veuillez actualiser la page de votre compte Gmail avant de commencer à envoyer des e-mails en masse à vos groupes de contacts nouvellement créés. Gmail doit mettre à jour toutes les données.
Ci-dessus, nous expliquons que lorsque vous exportez un modèle d'e-mail conçu avec Stripo vers votre compte Gmail, il est livré dans le dossier «Brouillons».
Une fois que vous avez exporté votre modèle personnalisé depuis Stripo, accédez à vos brouillons Gmail, ouvrez l'e-mail, puis dans la barre d'adresse, entrez le nom de votre groupe de contacts. Modifiez la ligne d'objet, ajoutez du texte au-dessus du modèle, et le tour est joué!
Facile comme tout!
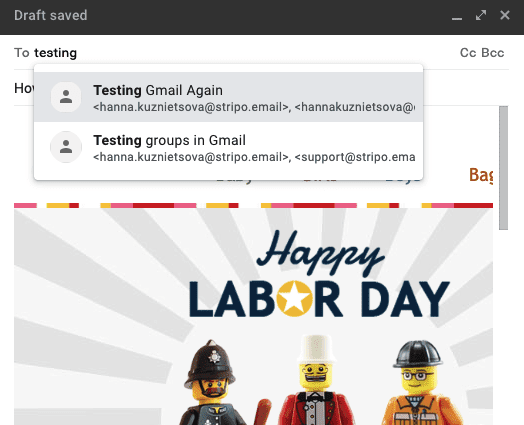
J'avais précédemment créé deux groupes: «Tester Gmail à nouveau» et «Tester des groupes dans Gmail». Donc, Gmail m'a suggéré de sélectionner l'un d'entre eux.
Il y a toutefois certaines limites:
- Un groupe contient moins de 100 contacts pour les comptes standards et jusqu'à 2 000 contacts pour les utilisateurs de Workspace (anciennement G-Suite).
- En utilisant cette méthode pour envoyer des e-mails en masse dans Gmail, vous pouvez envoyer gratuitement jusqu'à 500 e-mails par jour. Les utilisateurs de Workspace (anciennement G-Suite) sont autorisés à envoyer jusqu'à 2 000 e-mails par jour. Cependant, ceux qui possèdent un compte Workspace d'essai peuvent envoyer moins de 500 e-mails par jour.
Remarque: Google ne livrera pas d'e-mails à des adresses invalides. Vous pourrez les supprimer avant d'envoyer la prochaine newsletter.
Lorsque vous envoyez des e-mails en masse via Gmail, vous pouvez obtenir un rapport simple fourni par Gmail Postmaster tools. Il vous montrera:
- combien de vos e-mails ont été marqués comme spam;
- si vous vous en tenez aux meilleures pratiques de Gmail pour passer les filtres anti-spam;
- les raisons pour lesquelles vos e-mails n'ont pas été livrés le cas échéant.
Il ne vous montrera par contre pas le taux d'ouverture ou le taux de clics de vos e-mails. Donc, si vous en avez besoin, vous aurez peut-être besoin d'un outil tiers.
Way 2. Fusion pour Gmail par inspiration numérique
Mail Merge pour Gmail est un module complémentaire payant. Il est fourni par un service externe mais promu par Gmail. Il permet aux utilisateurs de Google Workspace d'envoyer jusqu'à 1 500 e-mails par jour, tandis que les utilisateurs de Gmail ne peuvent en envoyer que 400.
Mais avant de commencer à expliquer comment installer cet outil et comment l'utiliser, j'aimerais en décrire les avantages:
- il vous permet d'envoyer des e-mails en masse personnalisés;
- vous permet d’ajouter des pièces jointes individuelles pour chaque destinataire;
- de planifier des e-mails;
- vous fournit un rapport détaillé sur le taux d'ouverture, le taux de clics et même le nombre de ceux qui se sont désabonnés.
Alors, comment faire?
Avant d'utiliser cette application, vous devrez l'installer.
Installer l'appli
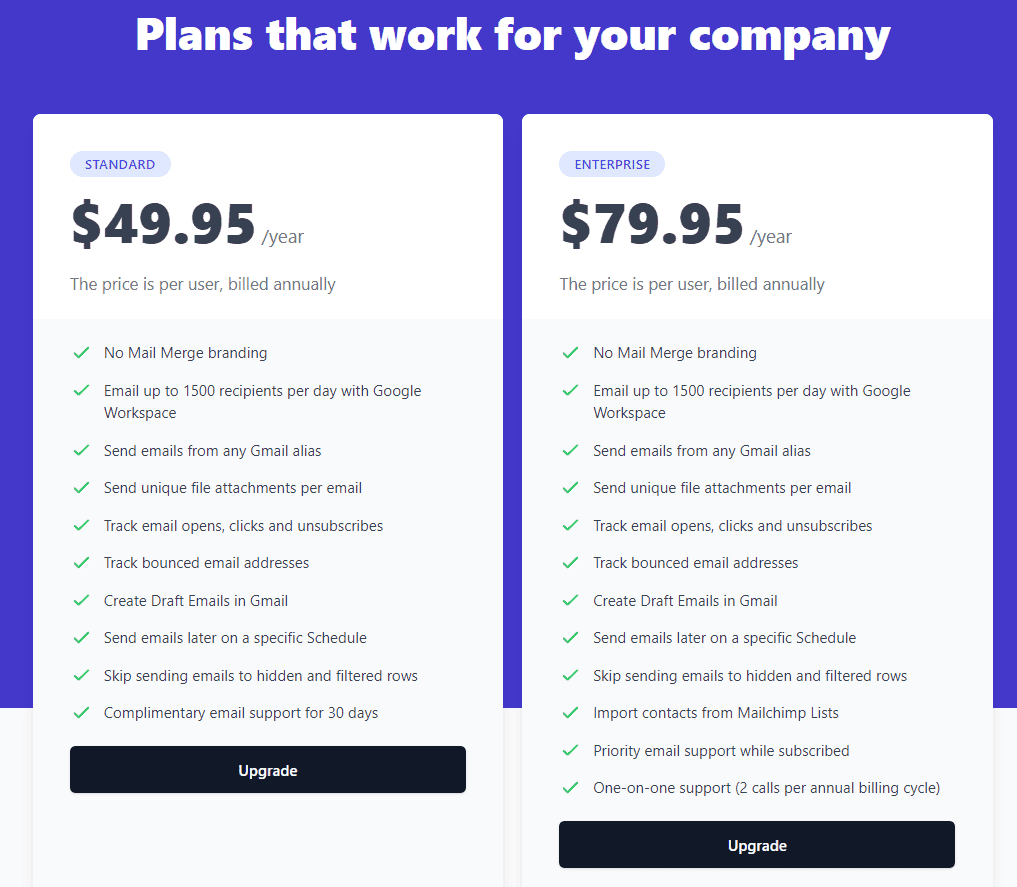
C'est un module complémentaire payant, voici donc la liste des prix.
Envoi d'e-mails de masse personnalisés avec des pièces jointes individuelles
Tout d’abord, vous devrez créer un groupe de contacts. Facile - importez simplement tous vos contacts dans le tableau de Mail Merge.
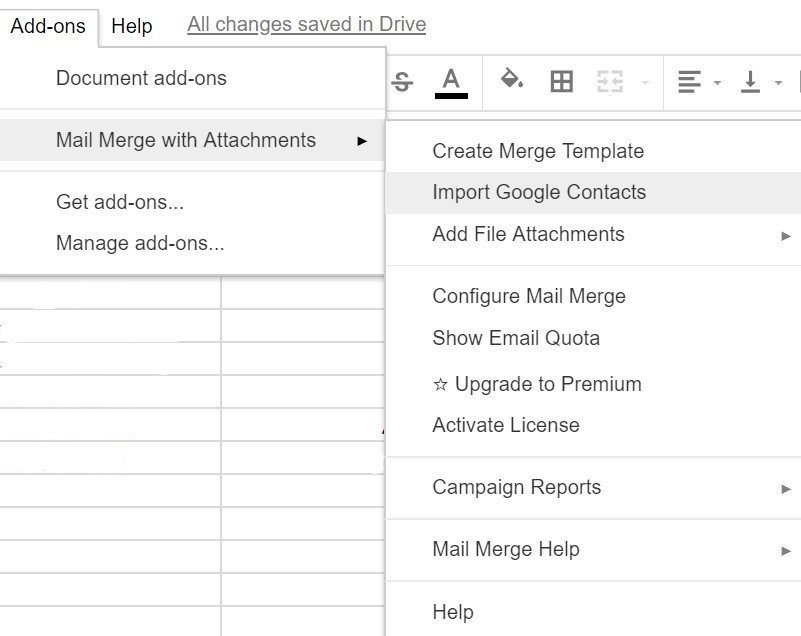
Vous pouvez créer quelques groupes de contacts dans votre compte Gmail, puis importer l’un d’entre eux groupe avant d'envoyer des e-mails en masse. Une fois que vous aurez importé votre base de contacts et l'aurez divisée en groupes, vous pourrez configurer les e-mails que vous êtes sur le point d'envoyer.
![]()
Ici, vous définissez le nom de l'expéditeur, le nom de la campagne et choisissez les statistiques sur lesquels vous vous concentrerez.
Ensuite, vous devrez sélectionner ce que vous allez envoyer: un brouillon préparé ou un nouvel e-mail.
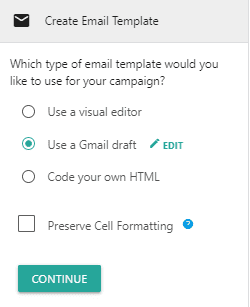
Je préfère l'option avec les brouillons, car, comme nous l’avons déjà dit, tous les modèles Stripo que vous exportez vers Gmail seront situés dans le dossier brouillons. Modifiez la ligne d'objet et supprimez votre signature standard du corps de votre e-mail si vous en avez défini une.
L'outil vous suggère même automatiquement de choisir un modèle parmi ceux qui existent déjà dans votre dossier.
Pour envoyer des e-mails avec des noms personnels, vous devez:
- mettre le paramètre entre accolades et l’inclure dans le brouillon;
- vous assurer que chaque petit symbole est écrit correctement, y compris les majuscules et les minuscules.
Votre brouillon ressemblera à ceci: "Bonjour, {{First Name}}"
Remarque: vous pouvez appliquer ce type de personnalisation aux lignes d'objet si vous le souhaitez.
Vous pouvez également inclure le nom de famille d'un destinataire et tout ce que vous voulez. C'est à vous de décider des paramètres à appliquer à vos e-mails.
Ce peut être le jour de la réunion et la date de livraison, par exemple… vous pourrez alors envoyer des e-mails personnalisés avec une date individuelle correcte.
Remarque: cet outil importe uniquement le «prénom», le «nom de famille» et «l'adresse e-mail».
Les champs comme la date de naissance, le lieu, etc. doivent être remplis manuellement.
Vous pouvez également joindre des fichiers individuels à chaque e-mail.
Planification d'e-mails en masse
Ce que j’apprécie le plus dans cet outil, c'est que vous pouvez planifier chaque e-mail individuellement.
Dans la colonne «Date prévue», insérez la date nécessaire pour chaque e-mail.

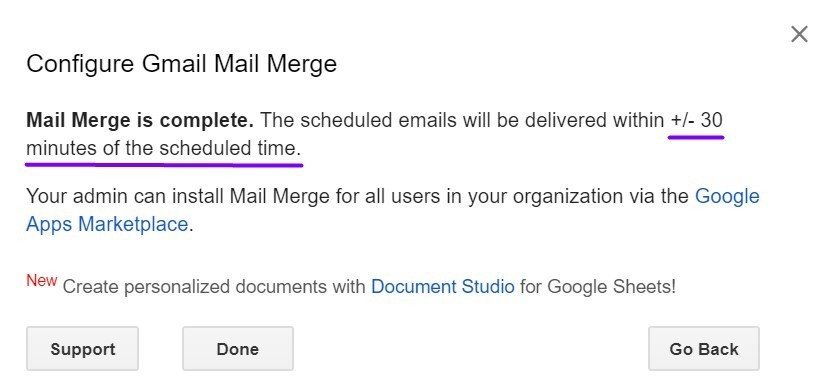
Si vous souhaitez les envoyer tous immédiatement, n'insérez simplement aucune date dans la colonne - laissez-la vide.
Lorsque certains e-mails sont planifiés et que d'autres e-mails sont envoyés instantanément, vous aurez une fenêtre contextuelle qui ressemblera à ceci:
Rapports détaillés
Eh oui, non seulement vous pouvez planifier des e-mails, mais également obtenir des rapports détaillés. Lors de la configuration de Gmail Mail Merge, pour chaque campagne précise, vous pourrez choisir les indicateurs que vous allez suivre:
- l'email ouvre le taux d'ouverture aka;
- les clics sur les liens, c'est-à-dire le taux de clics;
- lien de désabonnement aka taux de désabonnement.
Ou cochez-les tous…
Votre rapport ressemblera à ceci:

Comme vous pouvez le voir, il existe deux façons d'envoyer des e-mails en masse dans Gmail. Chaque manière a ses avantages. C'est donc à vous de choisir celle que vous préférez.
Je vous souhaite bonne chance!



4 commentaires