This guide will show you how to create a simple coloring game for your interactive newsletter. We’ll walk you through the whole process and give you full code samples to make your creation process much easier.
Did you know that April 9th is National Unicorn Day? It’s a whimsical and magical celebration of unicorns, mythical creatures often associated with purity, grace, and enchantment. Recently, Yespo developed the mechanics and design of a special themed game, while Stripo technically assisted with the interactivity and brought the game to life. This was a game where recipients need to color a unicorn.
People really liked the game, and many were interested in creating such beautiful, unique interactive content for emails. Well, you asked — we answered. In this guide, we will show you how to create this game and give you the complete code for it, which you can experiment with in your own email newsletters.
You can use this game to make your email more engaging and dedicate it to various occasions. For example, you can give discount promo codes for coloring the picture or present recipients with exclusive offers, based on their recent activity, after finishing the game.
The game creation process can be roughly divided into four stages: the “moon” background image, the palette, other images, and click zones. We will go through each stage in detail, and at the end, you will have your own full-fledged game that you can add to your email. Without further ado, let’s get started.
Stage 1. The “moon” background image
The “heart” of the game is images. First of all, let’s prepare the initial “moon” image. We will color it differently than other parts of the image because this is the very first layer. For the “moon,” we prepare an image with blank space instead of the moon and a background around it that matches the background of the email (in our case, it’s white).
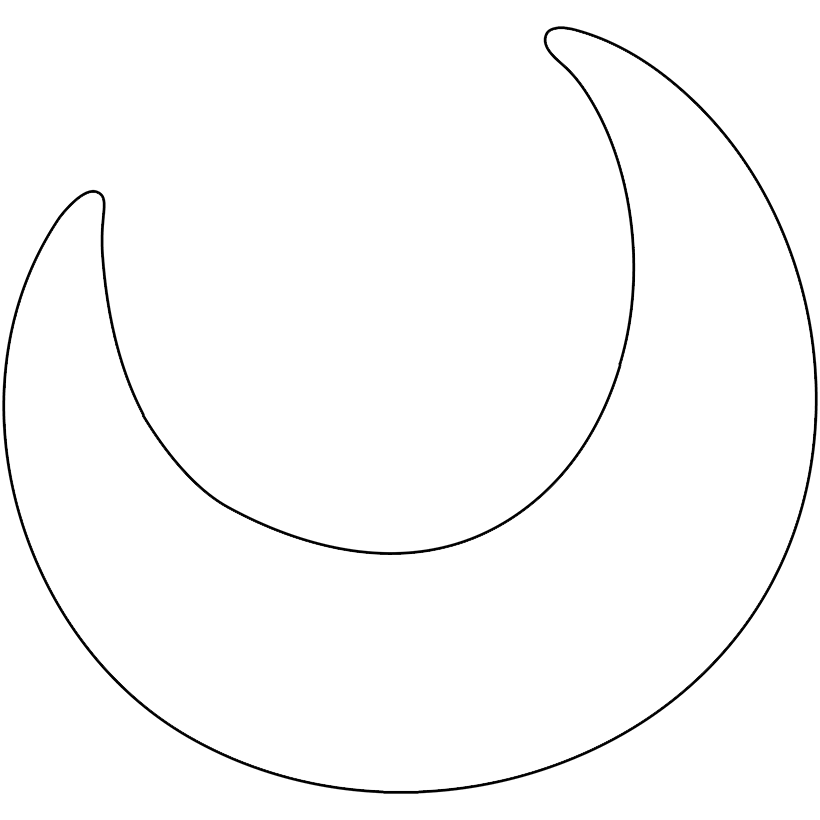
Important note: The size of our images has been doubled. As a result, for a game that is 420px wide, we made the image 840px wide.
Next, we uploaded the created image into the template and, after that, inserted the HTML block into the empty structure to add the following code:
<style amp-custom>
    .container-image {
        position: relative;
        width: 410px;
        height: 410px;
        margin: 0 auto;
    }

    .container-image div {
        position: absolute;
    }

    .container-image span {
        display: block;
        width: 100%;
        height: 100%;
        cursor: pointer;
        background-repeat: no-repeat;
        background-position: 0 0;
        background-size: cover;
    }

    .btn-color-1 span {
        background-color: #ffe14d;
    }

    .btn-color-2 span {
        background-color: #c9a3c7;
    }

    .btn-color-3 span {
        background-color: #ff5cd9;
    }

    .btn-color-4 span {
        background-color: #4099d4;
    }

    .layer-1 {
        width: 100%;
        height: 100%;
        left: 0;
        top: 0;
    }

    .layer-1 span {
        background-image: url(https://zlnfb.stripocdn.email/content/guids/CABINET_248acda4694b320e2c1fa70ebbbeec3aac0ca1fb50efddf513440d327edb6bf5/images/layer0102.png);
    }

    .colors ul {
        list-style-type: none;
        padding: 0;
        margin: 0;
        width: 100%;
        text-align: center;
        display: flex;
        justify-content: center;
        align-items: center;
    }

    .colors li {
        display: inline-block;
        margin: 0 5px;
    }

    .colors li:first-child {
        margin-right: 8px;
    }

    .colors li span {
        display: inline-block;
        width: 42px;
        height: 42px;
        border-radius: 50%;
        cursor: pointer;
        border: 2px solid #fff;
    }

    .colors li .active {
        border: 2px solid #333;
    }

@media only screen and (max-width: 600px) {
        .container-image {
            width: 250px;
            height: 250px;
        }
    }

</style>
<div class="container-image">
	<div class="layer-1"><span></span></div>
</div>
<div class="colors">
    <ul>
        <li class="btn-color-1"><span class="active"></span></li>
        <li class="btn-color-2"><span></span></li>
        <li class="btn-color-3"><span></span></li>
        <li class="btn-color-4"><span></span></li>
    </ul>
</div>
The container-image class is responsible for the size of the game. In our case, the game is 410 by 410 pixels in the desktop version and 250 by 250 pixels in the mobile version. You can change sizes here if you need different ones.
Inside the container-image block, there will be blocks with the classes layer-1, layer-2, layer-3, etc., which we will place in the right spots using absolute positioning. In these blocks, there is a span tag with images.
The block with the colors class is a color palette. The styles already indicate colors for each button btn-color-1, btn-color-2, etc., so you can replace them with your own.
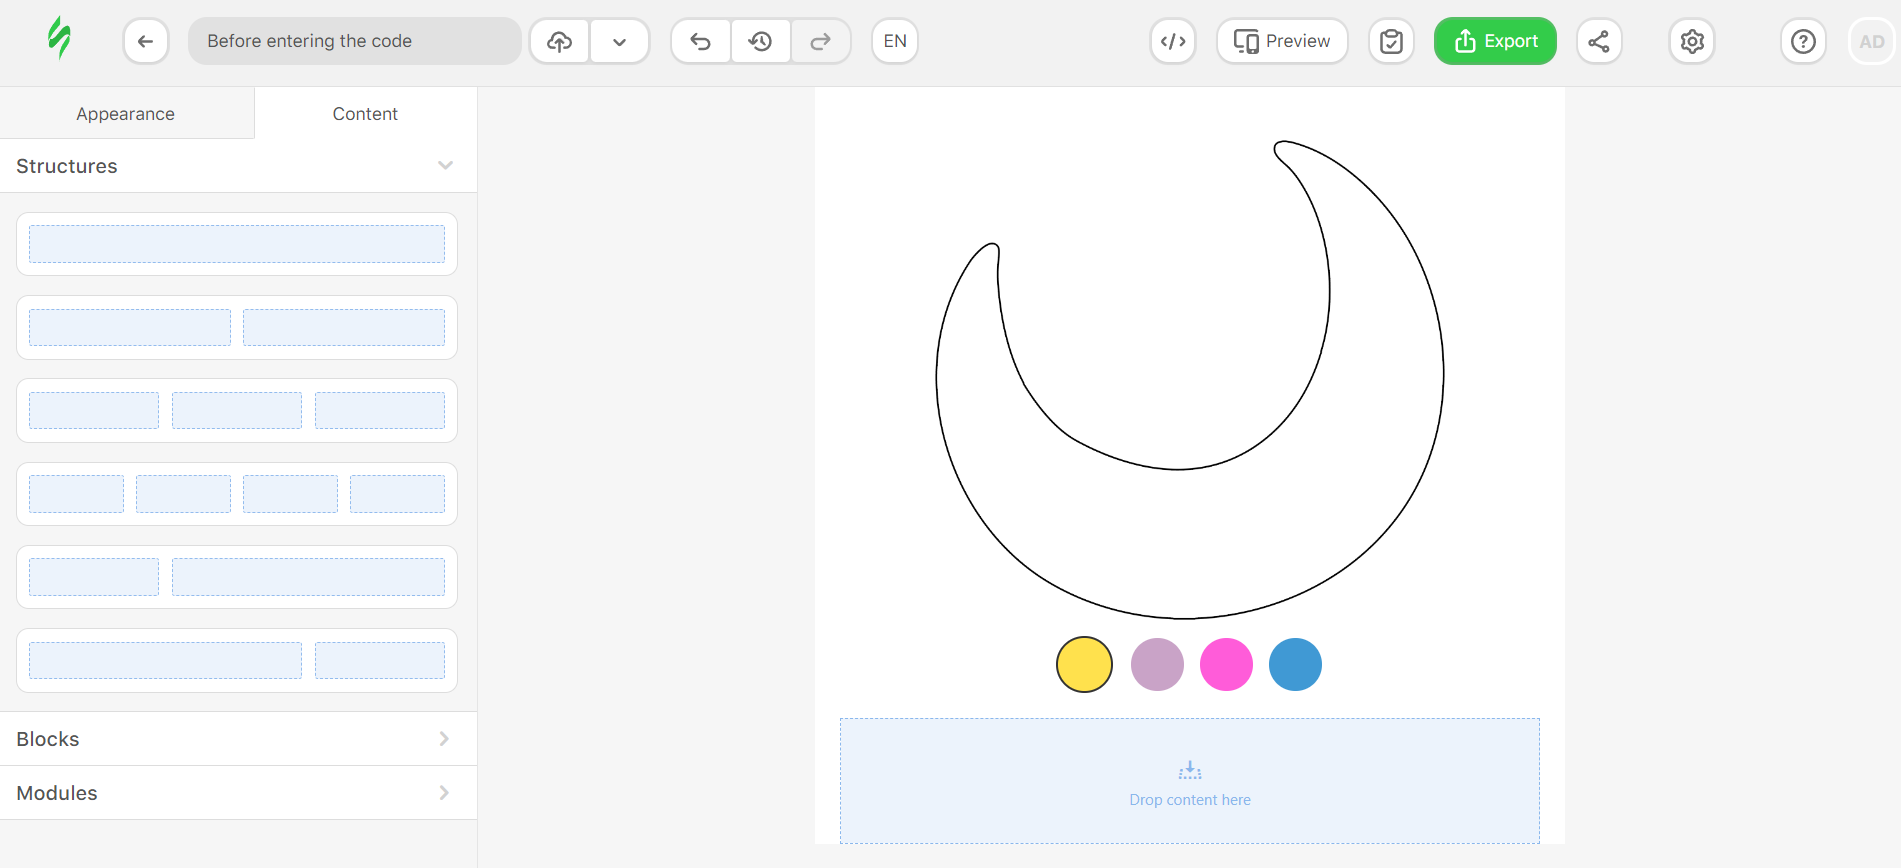
Once the code is inserted, you’ll see a crescent moon image and color panel.
Stage 2. The palette
The next step is to make the color palette clickable and show which color is selected. To understand what color is selected, we will create a “color” variable, and when you click on each element of the palette, we will write the value 1, 2, 3, etc., into it.
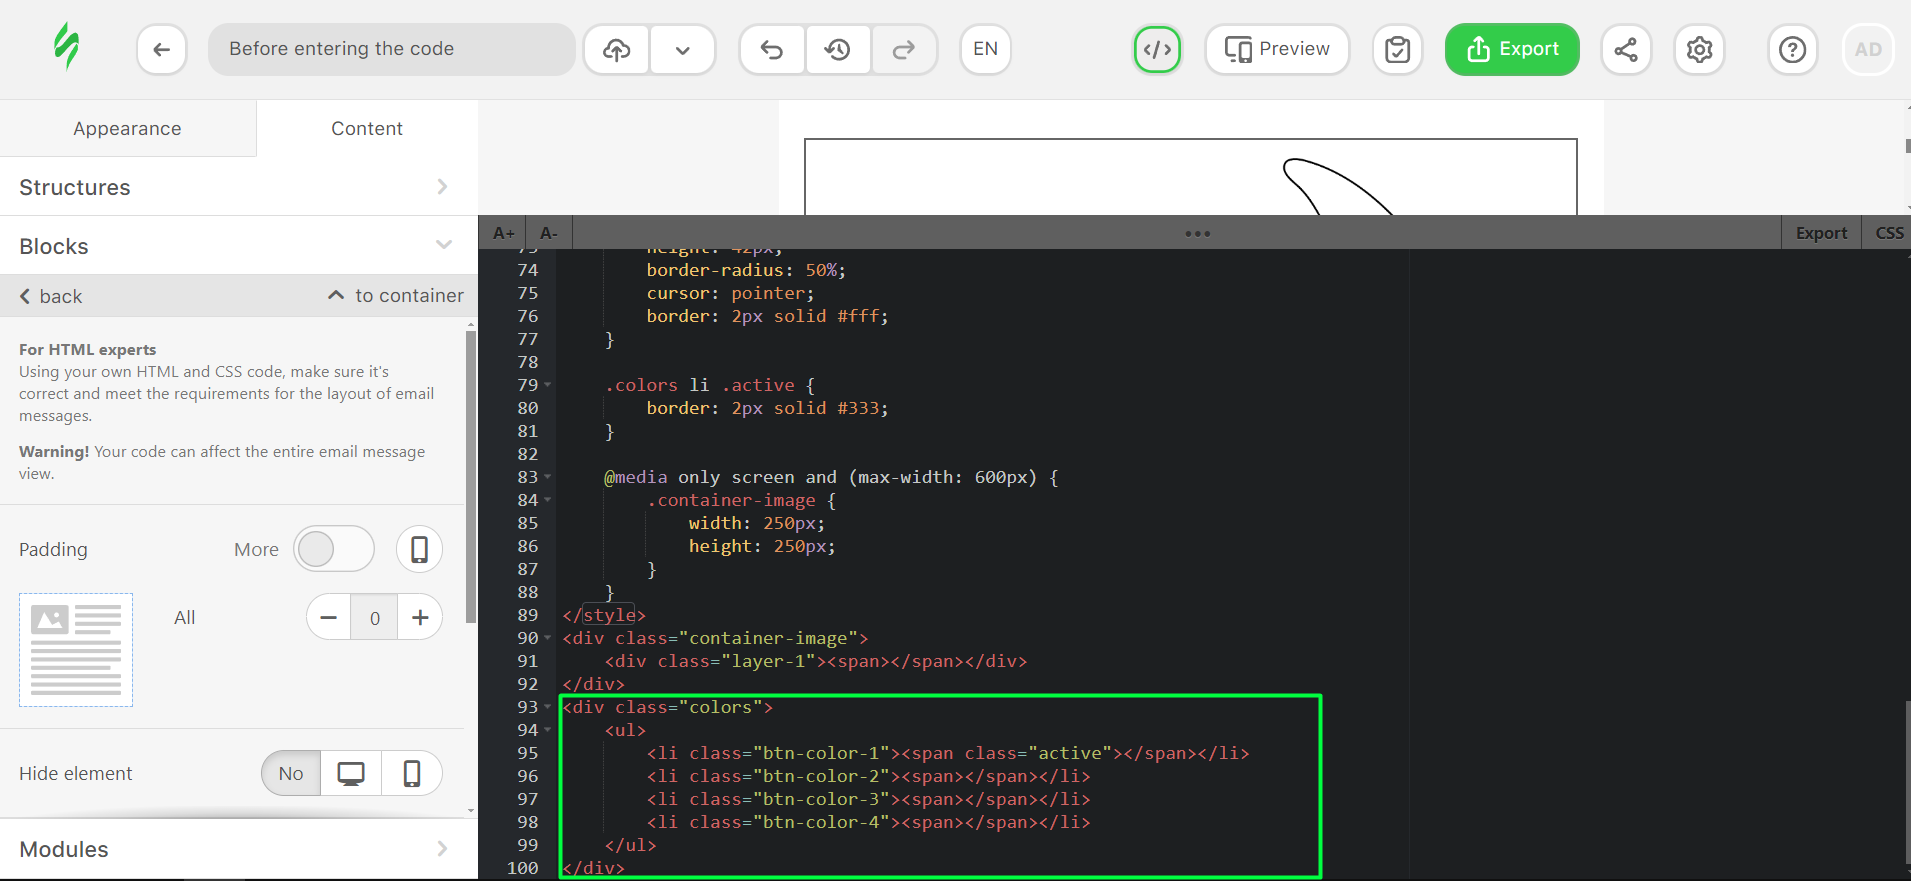
In order to make it, change the block with the palette to the following code:
<div class="colors">
<ul>
    <li class="btn-color-1"><span class="active" [class]="color == 1 || !color ? 'active' : '' " role="button" tabindex="1" on="tap:AMP.setState({color: 1})"></span></li>
    <li class="btn-color-2"><span [class]="color == 2 ? 'active' : '' " role="button" tabindex="1" on="tap:AMP.setState({color: 2})"></span></li>
    <li class="btn-color-3"><span [class]="color == 3 ? 'active' : '' " role="button" tabindex="1" on="tap:AMP.setState({color: 3})"></span></li>
    <li class="btn-color-4"><span [class]="color == 4 ? 'active' : '' " role="button" tabindex="1" on="tap:AMP.setState({color: 4})"></span></li>
</ul>
</div>
As a result, you’ll change this:
To receive the code like this:
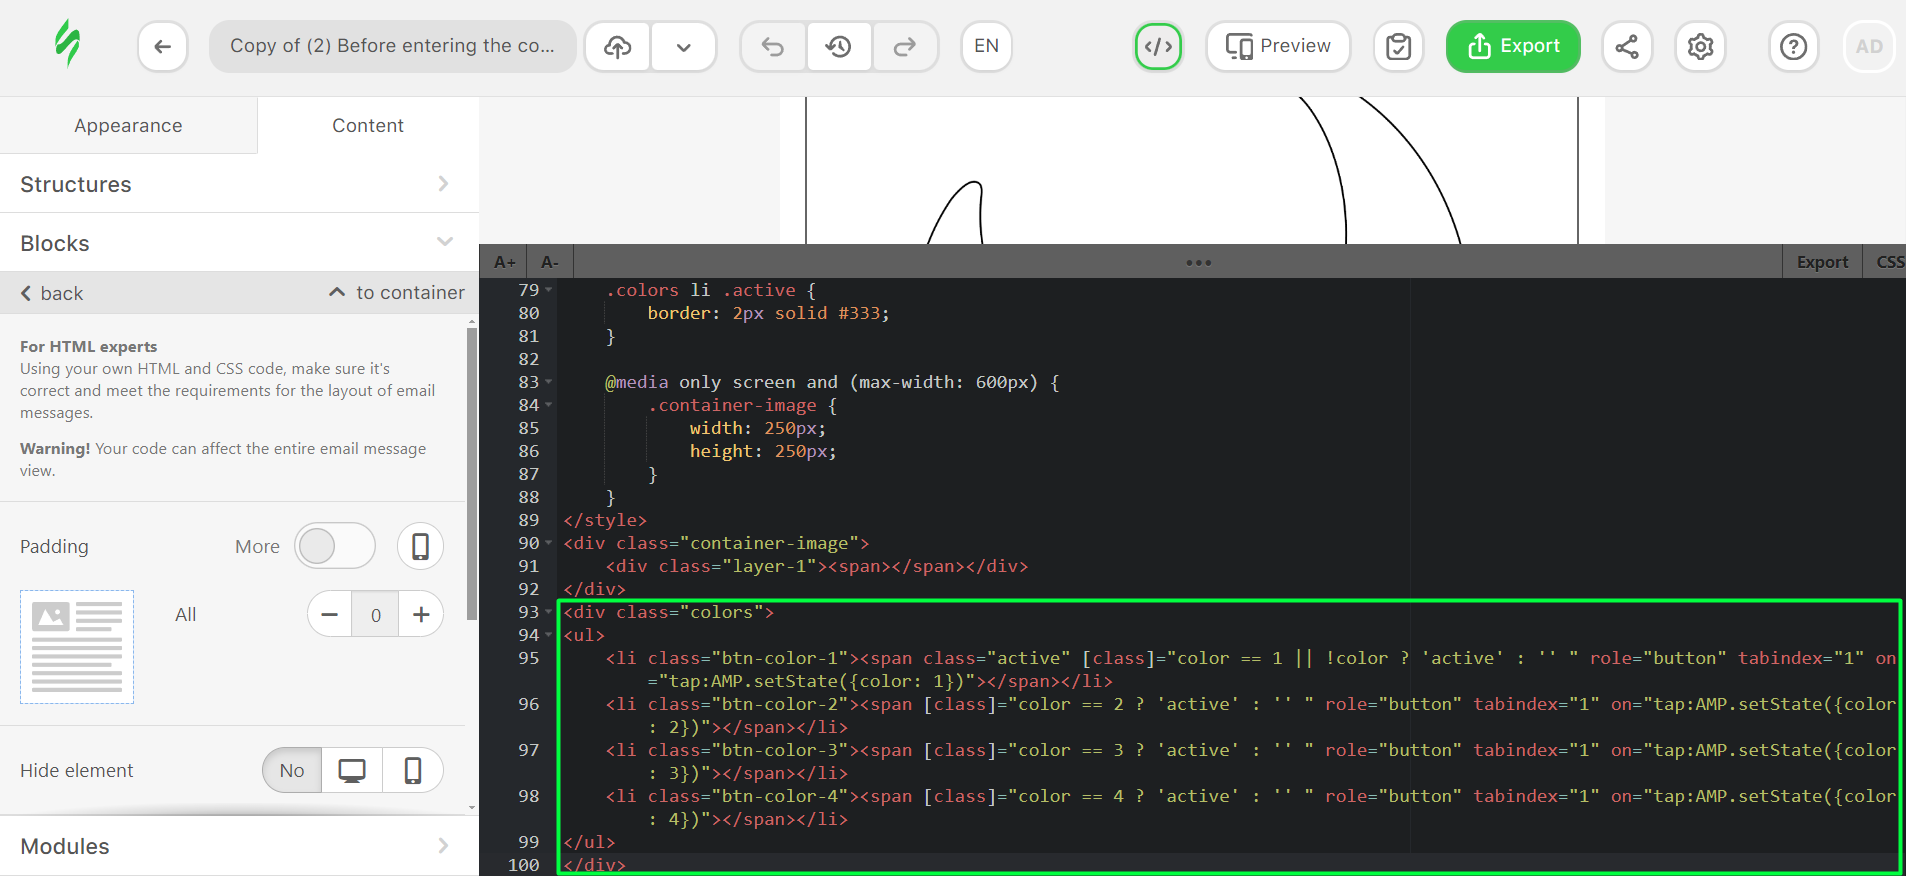
In this code, in order to make the elements clickable, we add the following attributes: <span role="button" tabindex="1" on="tap:AMP.setState({color: 1})">
Let’s consider each one in detail:
- role="button" — a required attribute that must be added along with on="tap:...", it changes the role of the element;
- tabindex="1" — required attribute, sets the order in which focus is received when moving between elements using the Tab key. The transition occurs from a lower value to a larger one, for example, from 1 to 2, then to 3, and so on;
- on="tap:" — click event handler;
- AMP.setState({ color: 1 }) — a method that allows you to create and change variables and their value.
To show the active element, we created the “active” class, and we added it to the element that the user clicks on.
The first color is selected by default, so it already has the “active” class assigned, and we added the following check to it:
[class]="color == 1 || !color ? 'active' : '' "
This is a shorthand notation of the condition, literally meaning that if the color variable is equal to 1 or if it has no value, then the class will be ‘active’ otherwise there is no class.
[class] — the class attribute is written in square brackets because this is how AMP specifies attributes whose values will change dynamically.
For all other colors, we add a shortened condition: if the value of the color variable is equal to the color number in order (2, 3, 4, etc.), then we add the 'active' class:
[class]="color == 2 ? 'active' : '' "
The next step will be painting the “moon.” To do this, we add the already familiar attributes to the span tag in a block with the layer-1 class:
<div class="layer-1">
    <span role="button" tabindex="1" [class]="layer1" on="tap:AMP.setState({layer1: color ? 'color'+color : 'color1'})"></span>
</div>
This is what the code looks like before pasting:
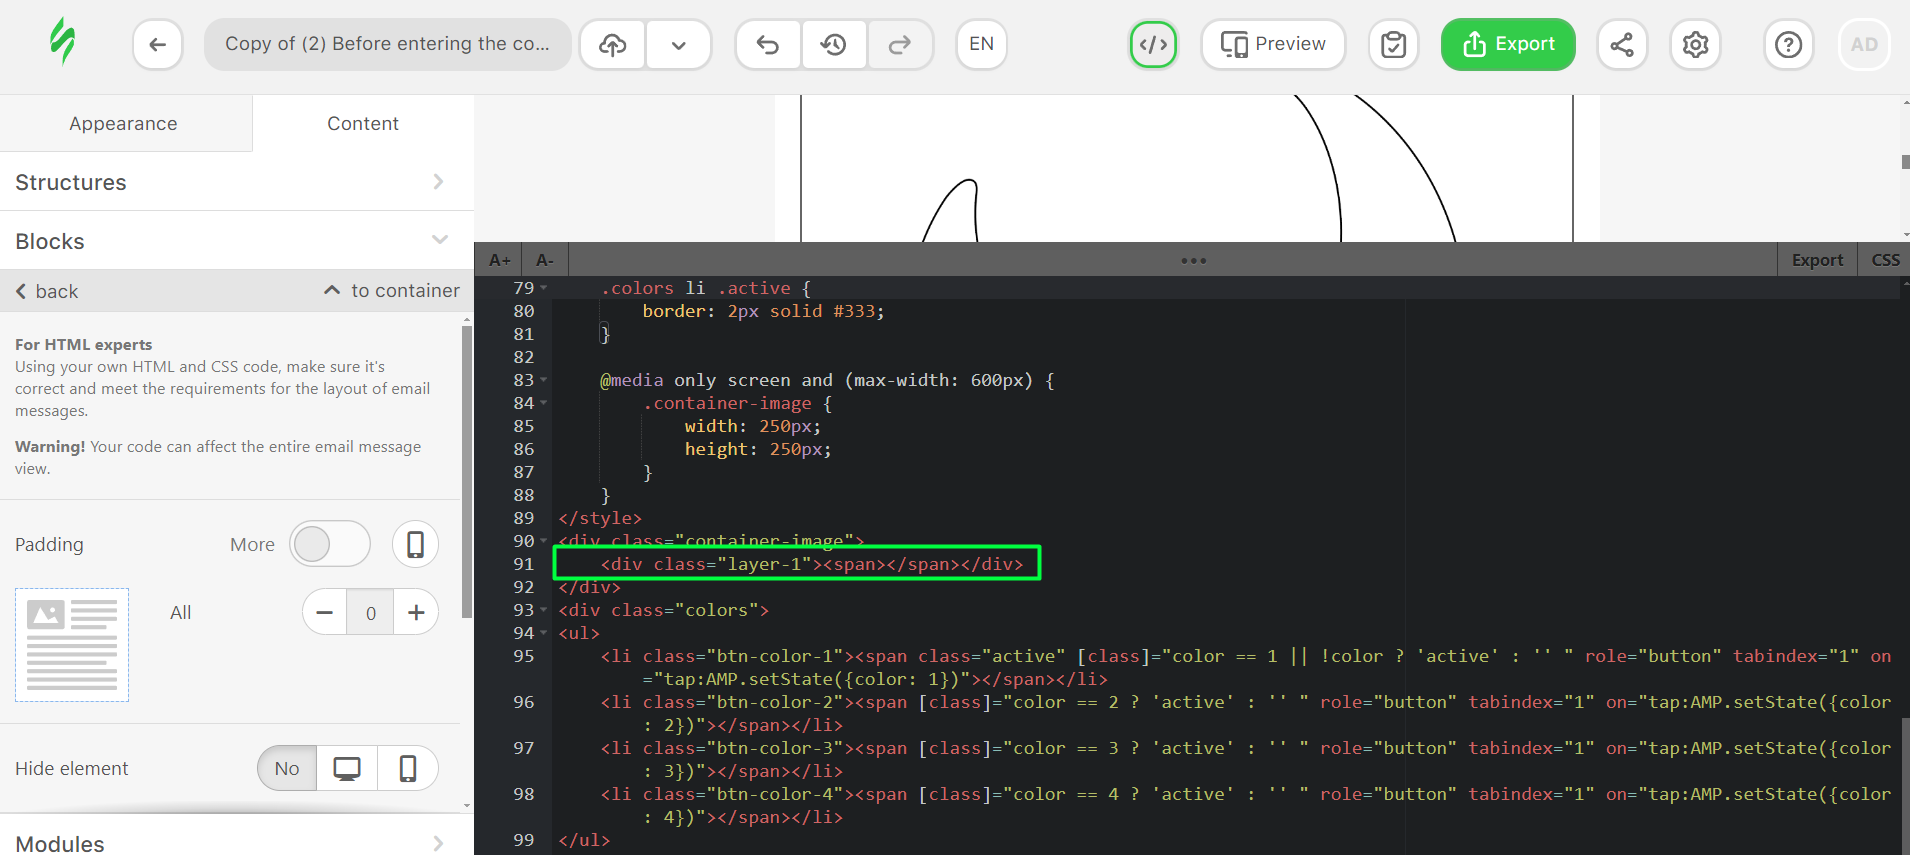
And this is the code after pasting:
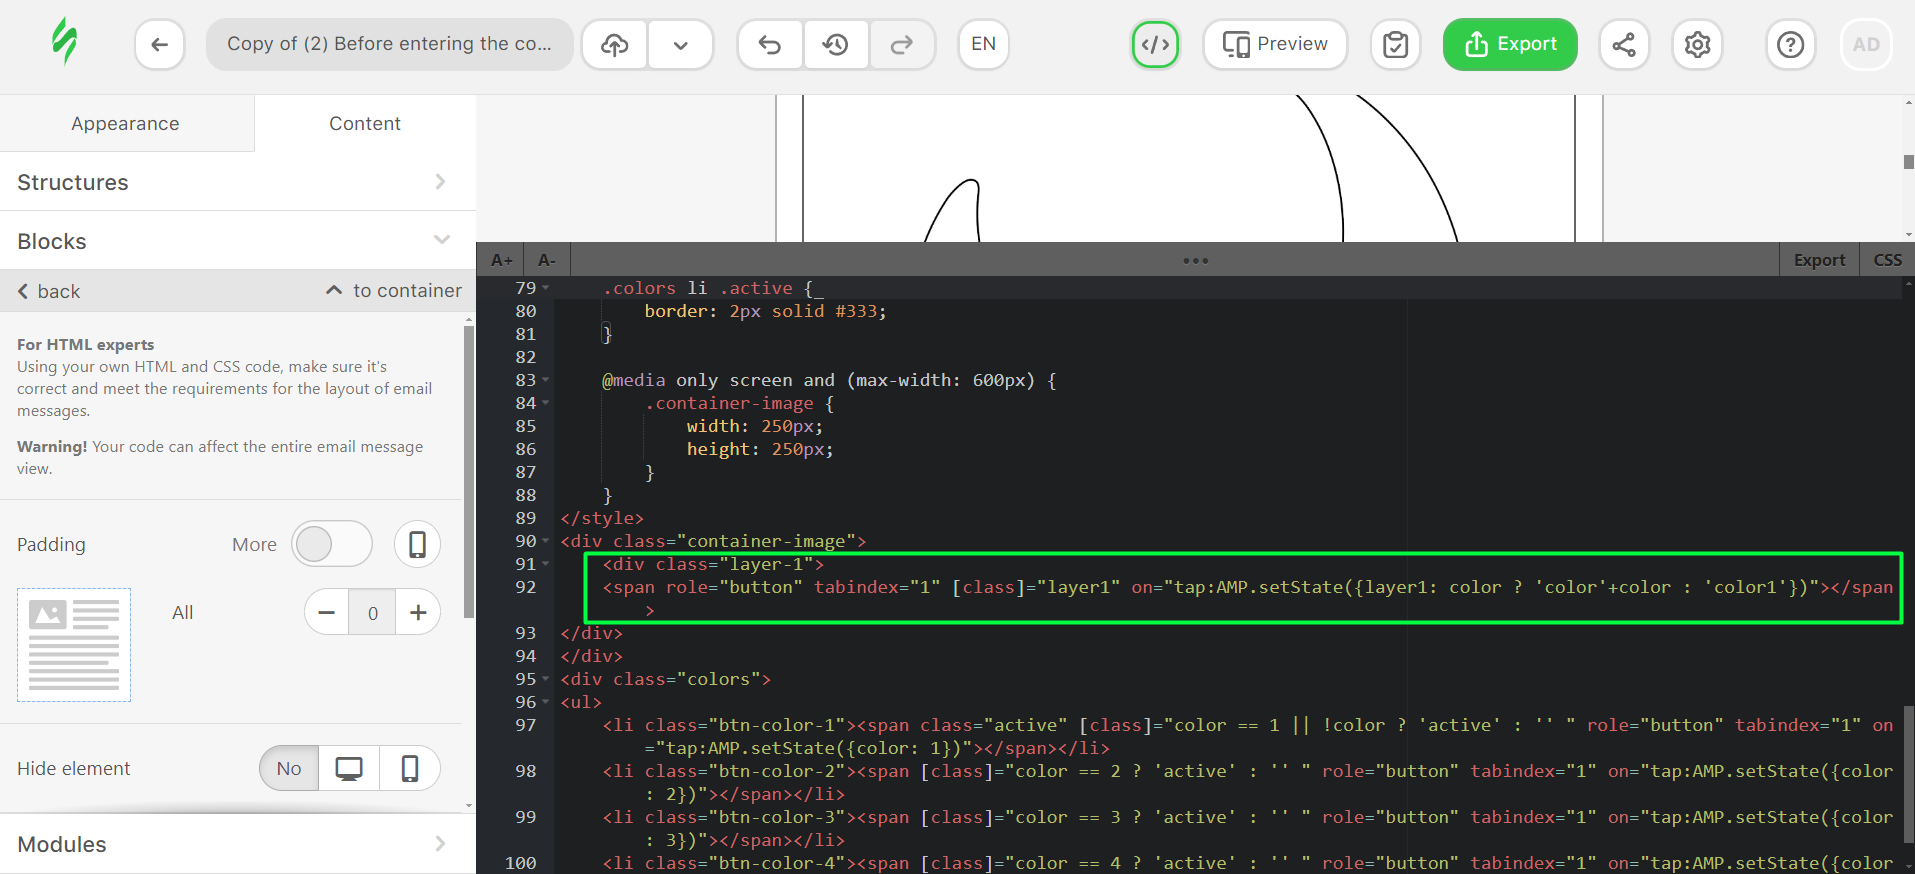
- [class]="layer1" — we substituted the class name from the layer1 variable;
- on="tap:AMP.setState({layer1: color ? 'color'+color : 'color1'})" — when clicked, a layer1 variable is created in which, if the color variable exists, 'color' is written plus the value of the variable (1, 2, 3). The result is the class 'color1', 'color2', etc. (if there is no color variable yet, the class will be 'color1').
After that, we add the code with the necessary styles:
.layer-1 .color1 {
    background-color: #ffe14d;
}

.layer-1 .color2  {
    background-color: #c9a3c7;
}

.layer-1 .color3  {
    background-color: #ff5cd9;
}

.layer-1 .color4  {
    background-color: #4099d4;
}
Stage 3. Other images
The first layer can now be painted over. Next, you need to prepare the image for the next layer. We divided the rest of the picture into pieces that will be painted over and made sprites for each piece with all the possible colors that will be available (and that are in the palette).
Important note: The distance between pieces of different colors must be the same.
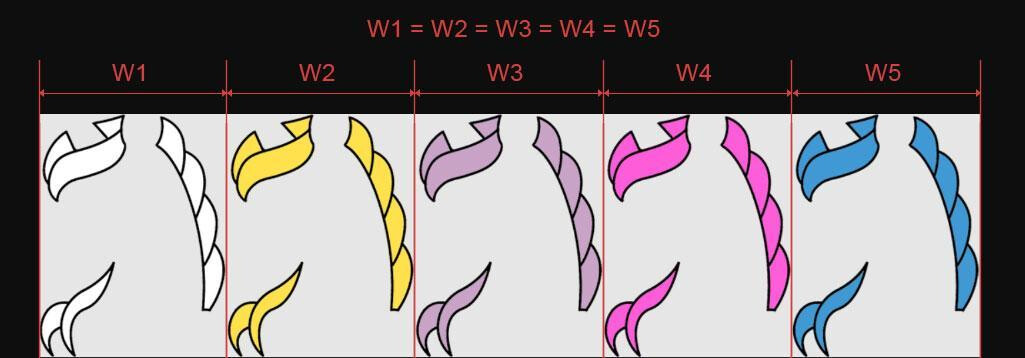
Here are the sources of the images for the game:
Next, you need to add layer 2 and 3 under the block with the class layer-1 and the corresponding styles for them. The layer code looks like this:
<div class="layer-2"><span role="button" tabindex="2" [class]="layer2" on="tap:AMP.setState({layer2: color ? 'color'+color : 'color1'})"></span></div>
<div class="layer-3"><span [class]="layer3"></span></div>
While the style code looks like this:
.layer-2 {
        width: 29.51%;
        height: 21.46%;
        left: 15.37%;
        top: 14.39%;
    }

    .layer-2 span {
        background-image: url(https://zlnfb.stripocdn.email/content/guids/CABINET_f61060edca5f418873af71474512724771bf46977f7bb9ac2b4e11c4c017d541/images/layer02.png);
    }

    .layer-3 {
        width: 17.56%;
        height: 36.34%;
        left: 12.68%;
        top: 46.34%;
    }

    .layer-3 span {
        background-image: url(https://zlnfb.stripocdn.email/content/guids/CABINET_248acda4694b320e2c1fa70ebbbeec3aac0ca1fb50efddf513440d327edb6bf5/images/layer03_uXc.png);
    }
.container-image span.color1 {
        background-position: 25% 0;
    }

    .container-image span.color2 {
        background-position: 50% 0;
    }

    .container-image span.color3 {
        background-position: 75% 0;
    }

    .container-image span.color4 {
        background-position: 100% 0;
    }
Coding tip: To place the pieces of the image in the right places, you can assign a background image for the parent block with the full image. In the console preview (F12 for Windows), move the piece to the desired place, then copy this value and place it in the code. When all the pieces are placed, remove this style from the image.
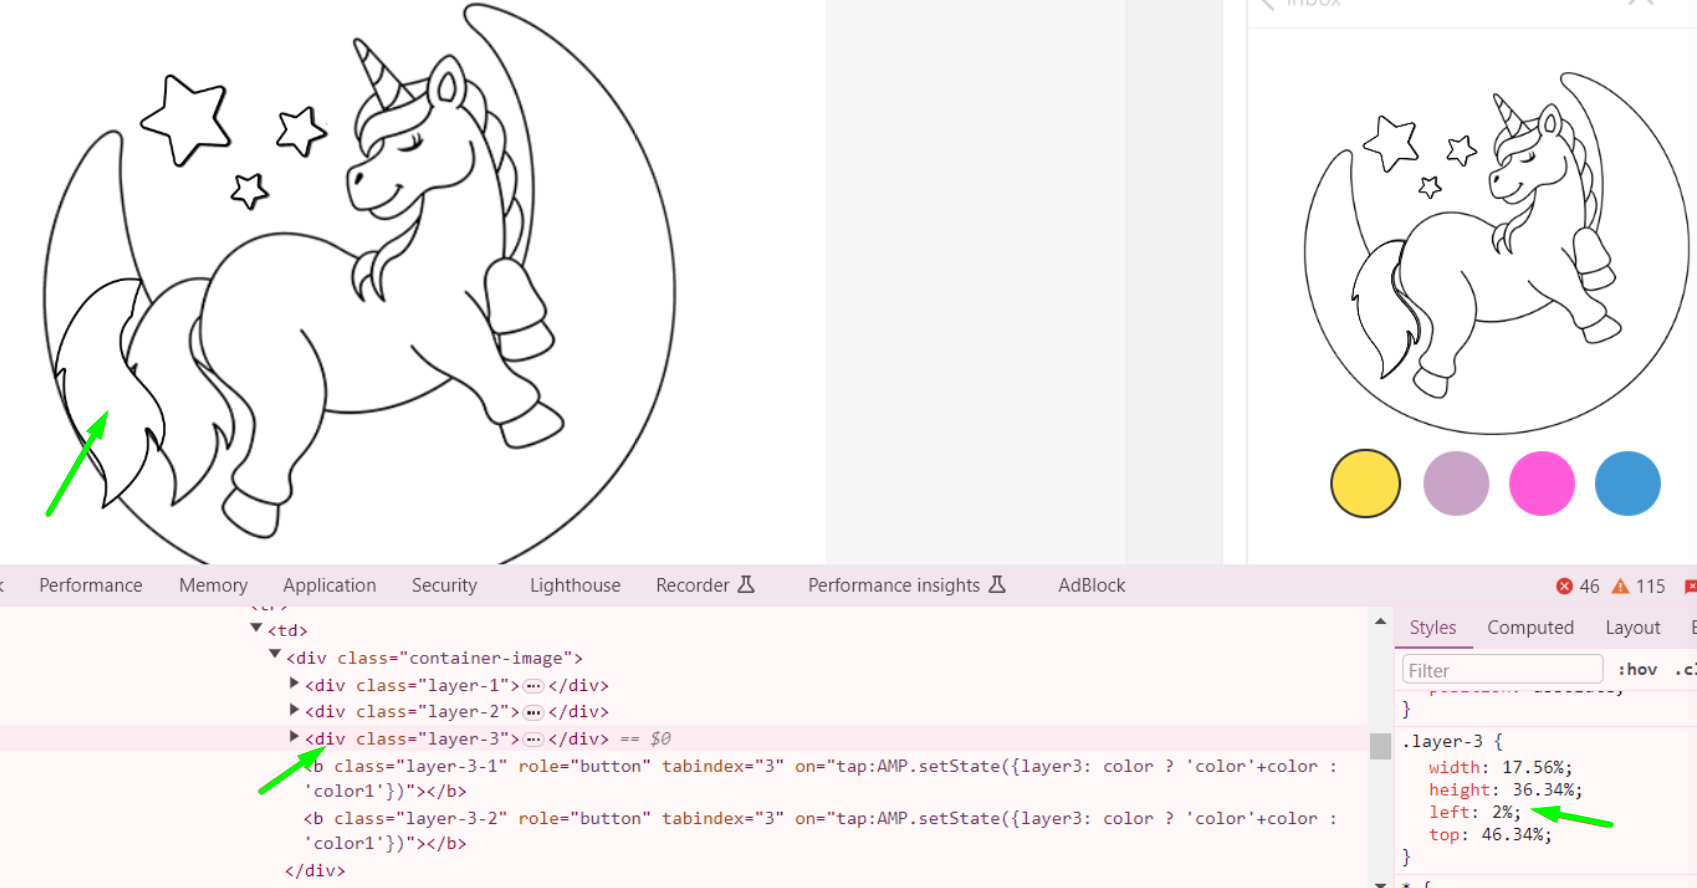
Styles are needed as we set the block sizes and arrange the pictures in their places with them. All values are in % so that you don’t need to change them on mobile. Also, for each color, a style has been added that shows the part of the picture corresponding to this color.
How to calculate everything in %:
For example, let’s take a “star” picture. This picture helps show how you calculate everything properly.

First, you need to determine the dimensions in pixels, which is the real size of the picture. In this case, the size is 1210px by 175px. However, we have five stars in a row, and we need the width of one, so we divide the width by 5. In addition, all our images are twice as large as necessary, so we also divide these dimensions by 2.
Total width: 1210/5 = 242/2 = 121px, height 175/2 = 87.5px.
Now you need to convert everything to %. The width of our block with the game is 410px is 100%, the width of the image is 121px is X.
As a result, we get:
X = 121*100/410 = 29.5%
We do the same with height:
X = 87.5*100/410 = 21.34%
The values “left” and “top” can immediately be set as percentages.
Stage 4. Click zones
Now, you can change colors and paint over the “moon” and “stars” but not the “tail.” The click zone for images is rectangular, so it overlaps some of the other images and looks like this:
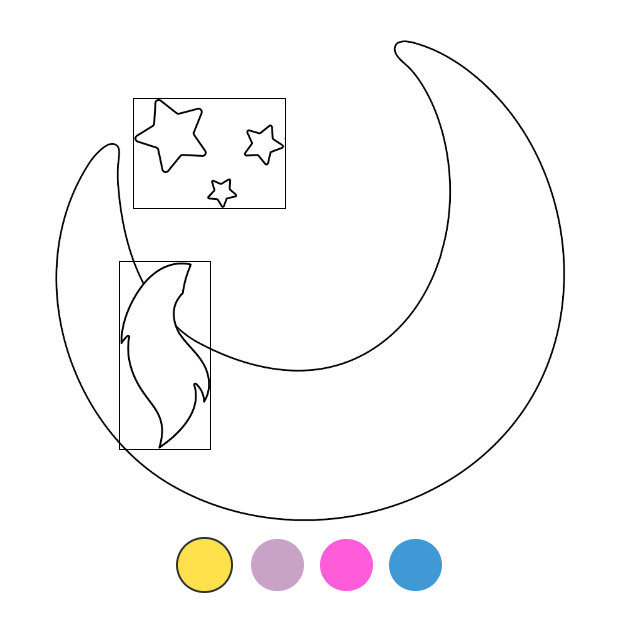
Since the “stars” do not overlap other pictures, we placed a click on the image itself, but the “tail” overlaps part of the “moon,” so it is necessary to add additional elements for a correct click zone.
To do this, we need to add two blocks for the tail after the block with the layer-3 class:
<b class="layer-3-1" role="button" tabindex="3" on="tap:AMP.setState({layer3: color ? 'color'+color : 'color1'})"></b>
<b class="layer-3-2" role="button" tabindex="3" on="tap:AMP.setState({layer3: color ? 'color'+color : 'color1'})"></b>

Please note that these are the blocks for the “tail,” which uses the layer3 variable, so, for them, we also use the layer3 variable.
Once pasted, it’s time to add some styles:
.layer-3-1,
    .layer-3-2 {
        display: block;
        position: absolute;
        cursor: pointer;
    }

    .layer-3-1 {
        width: 10.49%;
        height: 17.07%;
        left: 14.39%;
        top: 45.85%;
        transform: rotate(10deg);
    }

    .layer-3-2 {
        width: 11.95%;
        height: 16.83%;
        left: 16.83%;
        top: 60.24%;
        transform: rotate(-21deg);
    }
The basic code is the same as in the previous layers — only in the styles, we added a transform to make the click zone more precise.
If we add a border to the blocks we just inserted, we will see a new click zone:
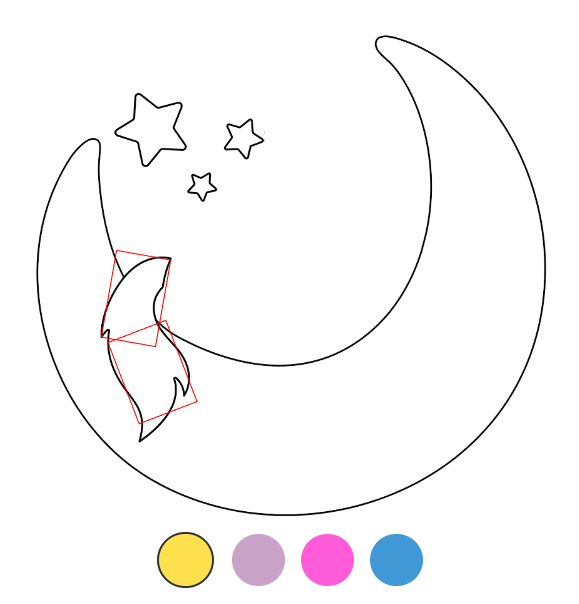
This way, we add all the pieces of the image. For those that overlap others or overlap themselves, we add additional blocks — on which we attach a click event.
Endgame message
In the end, it is worth adding a block with a message that will be shown when the user colors all the layers. To do this, you need to add a block with text that will be shown when all the variables — layer1, layer2, layer3, layer4, etc. — have a value.
At the moment, we have only added three layers, so only three variables are listed. At the end of the game, they should match the number of layer variables.
To add a message at the end of the game, copy this code under the block with the colors class:
<div class="message" hidden [hidden]="!layer1 || !layer2 || !layer3">
    <h2><b>Вау, це просто шедевр! </b>😍</h2>
</div>
The hidden attribute is specified here because the block should be hidden at the beginning of the game. Then, the [hidden] attribute adds or removes the hidden attribute, depending on the condition inside. In our case, the block will be hidden as long as at least one of the listed variables is empty. As soon as all variables receive a value, the hidden attribute will be removed.
Also, our game block is hidden after coloring. To do this, we need to add another condition to the block with the colors class:
[hidden]="layer1 && layer2 && layer3"

The [hidden] attribute will be added when all variables have a value and the block is hidden.
Full game code sample
So, we have looked at all the components of the game, what they are for, and how they work. After all the manipulations, the game code should look like this:
<style amp-custom>
    .container-image {
        position: relative;
        width: 410px;
        height: 410px;
        margin: 0 auto;
    }

    .container-image div {
        position: absolute;
    }

    .container-image span {
        display: block;
        width: 100%;
        height: 100%;
        cursor: pointer;
        background-repeat: no-repeat;
        background-position: 0 0;
        background-size: cover;
    }

    .layer-1 .color1,
    .btn-color-1 span {
        background-color: #ffe14d;
    }

    .layer-1 .color2,
    .btn-color-2 span {
        background-color: #c9a3c7;
    }

    .layer-1 .color3,
    .btn-color-3 span {
        background-color: #ff5cd9;
    }

    .layer-1 .color4,
    .btn-color-4 span {
        background-color: #4099d4;
    }

    .layer-1 {
        width: 100%;
        height: 100%;
        left: 0;
        top: 0;
    }

    .layer-1 span {
        background-image: url(https://zlnfb.stripocdn.email/content/guids/CABINET_248acda4694b320e2c1fa70ebbbeec3aac0ca1fb50efddf513440d327edb6bf5/images/layer0102.png);
    }

    .layer-1-1,
    .layer-1-2,
    .layer-1-3,
    .layer-1-4 {
        display: block;
        position: absolute;
        cursor: pointer;
    }

    .layer-1-1 {
        width: 24.39%;
        height: 26.83%;
        transform: rotate(-15deg);
        left: 46.34%;
        top: 65.61%;
    }

    .layer-1-2 {
        width: 14.39%;
        height: 21.46%;
        transform: rotate(21deg);
        left: 39.02%;
        top: 72.93%;
    }

    .layer-1-3 {
        width: 13.17%;
        height: 15.37%;
        transform: rotate(-15deg);
        left: 71.95%;
        top: 72.93%;
    }

    .layer-1-4 {
        width: 9.02%;
        height: 39.27%;
        transform: rotate(-9deg);
        left: 75.85%;
        top: 9.76%;
    }

    .container-image span.color1 {
        background-position: 25% 0;
    }

    .container-image span.color2 {
        background-position: 50% 0;
    }

    .container-image span.color3 {
        background-position: 75% 0;
    }

    .container-image span.color4 {
        background-position: 100% 0;
    }

    .layer-2 {
        width: 29.51%;
        height: 21.46%;
        left: 15.37%;
        top: 14.39%;
    }

    .layer-2 span {
        background-image: url(https://zlnfb.stripocdn.email/content/guids/CABINET_f61060edca5f418873af71474512724771bf46977f7bb9ac2b4e11c4c017d541/images/layer02.png);
    }

    .layer-3 {
        width: 17.56%;
        height: 36.34%;
        left: 12.68%;
        top: 46.34%;
    }

    .layer-3 span {
        background-image: url(https://zlnfb.stripocdn.email/content/guids/CABINET_248acda4694b320e2c1fa70ebbbeec3aac0ca1fb50efddf513440d327edb6bf5/images/layer03_uXc.png);
    }

    .layer-3-1,
    .layer-3-2 {
        display: block;
        position: absolute;
        cursor: pointer;
    }

    .layer-3-1 {
        width: 10.49%;
        height: 17.07%;
        left: 14.39%;
        top: 45.85%;
        transform: rotate(10deg);
    }

    .layer-3-2 {
        width: 11.95%;
        height: 16.83%;
        left: 16.83%;
        top: 60.24%;
        transform: rotate(-21deg);
    }

    .layer-4 {
        width: 53.90%;
        height: 34.63%;
        left: 28.29%;
        top: 52.93%;
    }

    .layer-4 span {
        background-image: url(https://zlnfb.stripocdn.email/content/guids/CABINET_8ae58955cfb1c968315c9464fb0b20f3fa55d574a142348227e4440a245bf429/images/layer04.png);
    }

    .layer-4-1,
    .layer-4-2,
    .layer-4-3 {
        display: block;
        position: absolute;
        width: 9.76%;
        height: 7.07%;
        cursor: pointer;
    }

    .layer-4-1 {
        left: 28.05%;
        top: 80.00%;
    }

    .layer-4-2 {
        left: 70.98%;
        top: 52.93%;
    }

    .layer-4-3 {
        left: 71.95%;
        top: 66.10%;
    }

    .layer-5 {
        width: 54.88%;
        height: 71.22%;
        left: 24.39%;
        top: 11.22%;
    }

    .layer-5 span {
        background-image: url(https://zlnfb.stripocdn.email/content/guids/CABINET_248acda4694b320e2c1fa70ebbbeec3aac0ca1fb50efddf513440d327edb6bf5/images/layer05.png);
    }

    .layer-5-1,
    .layer-5-2,
    .layer-5-3,
    .layer-5-4,
    .layer-5-5,
    .layer-5-6,
    .layer-5-7,
    .layer-5-8 {
        display: block;
        position: absolute;
        cursor: pointer;
    }

    .layer-5-1 {
        width: 11.22%;
        height: 21.46%;
        transform: rotate(18deg);
        left: 31.71%;
        top: 59.76%;
    }

    .layer-5-2 {
        width: 22.44%;
        height: 23.90%;
        left: 26.10%;
        top: 39.76%;
    }

    .layer-5-3 {
        width: 8.54%;
        height: 21.46%;
        transform: rotate(-32deg);
        left: 64.88%;
        top: 48.05%;
    }

    .layer-5-4 {
        width: 9.02%;
        height: 10.73%;
        transform: rotate(-19deg);
        left: 68.54%;
        top: 43.90%;
    }

    .layer-5-5 {
        width: 22.44%;
        height: 16.83%;
        transform: rotate(-16deg);
        left: 41.71%;
        top: 49.51%;
    }

    .layer-5-6 {
        width: 11.95%;
        height: 18.29%;
        transform: rotate(-18deg);
        left: 58.29%;
        top: 21.46%;
    }

    .layer-5-7 {
        width: 11.46%;
        height: 18.29%;
        transform: rotate(30deg);
        left: 57.32%;
        top: 35.37%;
    }

    .layer-5-8 {
        width: 10.00%;
        height: 20.49%;
        transform: rotate(-123deg);
        left: 52.93%;
        top: 18.78%;
    }

    .layer-6 {
        width: 27.32%;
        height: 35.37%;
        left: 48.54%;
        top: 14.88%;
    }

    .layer-6 span {
        background-image: url(https://zlnfb.stripocdn.email/content/guids/CABINET_a9f2a37800ac6365b7305670b3e9505b3b265fbf13535f0419236592cf77d260/images/layer06.png);
    }

    .layer-7 {
        width: 10.24%;
        height: 11.71%;
        left: 48.78%;
        top: 8.78%;
    }

    .layer-7 span {
        background-image: url(https://zlnfb.stripocdn.email/content/guids/CABINET_248acda4694b320e2c1fa70ebbbeec3aac0ca1fb50efddf513440d327edb6bf5/images/layer07.png);
    }

    .layer-7-1 {
        display: block;
        position: absolute;
        cursor: pointer;
        width: 13.41%;
        height: 5.37%;
        transform: rotate(60deg);
        left: 46.34%;
        top: 11.22%;
    }

    .colors ul {
        list-style-type: none;
        padding: 0;
        margin: 0;
        width: 100%;
        text-align: center;
        display: flex;
        justify-content: center;
        align-items: center;
    }

    .colors li {
        display: inline-block;
        margin: 0 5px;
    }

    .colors li span {
        display: inline-block;
        width: 42px;
        height: 42px;
        border-radius: 50%;
        cursor: pointer;
        border: 2px solid #fff;
    }

    .colors li .active {
        border: 2px solid #333;
    }

    .message {
        padding: 10px 10px 0;
        text-align: center;
    }

    @media only screen and (max-width: 600px) {
        .colors li span {
            width: 32px;
            height: 32px;
        }

        .container-image {
            width: 250px;
            height: 250px;
        }
    }
</style>
<div class="container-image">
    <div class="layer-1"><span role="button" tabindex="1" [class]="layer1" on="tap:AMP.setState({layer1: color ? 'color'+color : 'color1'})"></span></div>
    <div class="layer-4"><span [class]="layer4"></span></div>
    <div class="layer-7"><span [class]="layer7"></span></div>
    <div class="layer-5"><span [class]="layer5"></span></div>
    <div class="layer-6"><span [class]="layer6" role="button" tabindex="6" on="tap:AMP.setState({layer6: color ? 'color'+color : 'color1'})"></span></div>
    <div class="layer-2"><span role="button" tabindex="2" [class]="layer2" on="tap:AMP.setState({layer2: color ? 'color'+color : 'color1'})"></span></div>
    <div class="layer-3"><span [class]="layer3"></span></div>
    <b class="layer-5-1" role="button" tabindex="5" on="tap:AMP.setState({layer5: color ? 'color'+color : 'color1'})"></b><b class="layer-5-2" role="button" tabindex="5" on="tap:AMP.setState({layer5: color ? 'color'+color : 'color1'})"></b><b class="layer-5-3" role="button" tabindex="5" on="tap:AMP.setState({layer5: color ? 'color'+color : 'color1'})"></b><b class="layer-5-4" role="button" tabindex="5" on="tap:AMP.setState({layer5: color ? 'color'+color : 'color1'})"></b><b class="layer-5-5" role="button" tabindex="5" on="tap:AMP.setState({layer5: color ? 'color'+color : 'color1'})"></b><b class="layer-5-6" role="button" tabindex="5" on="tap:AMP.setState({layer5: color ? 'color'+color : 'color1'})"></b><b class="layer-5-7" role="button" tabindex="5" on="tap:AMP.setState({layer5: color ? 'color'+color : 'color1'})"></b><b class="layer-5-8" role="button" tabindex="5" on="tap:AMP.setState({layer5: color ? 'color'+color : 'color1'})"></b><b class="layer-4-1" role="button" tabindex="4" on="tap:AMP.setState({layer4: color ? 'color'+color : 'color1'})"></b><b class="layer-4-2" role="button" tabindex="4" on="tap:AMP.setState({layer4: color ? 'color'+color : 'color1'})"></b><b class="layer-4-3" role="button" tabindex="4" on="tap:AMP.setState({layer4: color ? 'color'+color : 'color1'})"></b><b class="layer-7-1" role="button" tabindex="7" on="tap:AMP.setState({layer7: color ? 'color'+color : 'color1'})"></b><b class="layer-3-1" role="button" tabindex="3" on="tap:AMP.setState({layer3: color ? 'color'+color : 'color1'})"></b><b class="layer-3-2" role="button" tabindex="3" on="tap:AMP.setState({layer3: color ? 'color'+color : 'color1'})"></b><b class="layer-1-1" role="button" tabindex="1" on="tap:AMP.setState({layer1: color ? 'color'+color : 'color1'})"></b><b class="layer-1-2" role="button" tabindex="1" on="tap:AMP.setState({layer1: color ? 'color'+color : 'color1'})"></b><b class="layer-1-3" role="button" tabindex="1" on="tap:AMP.setState({layer1: color ? 'color'+color : 'color1'})"></b><b class="layer-1-4" role="button" tabindex="1" on="tap:AMP.setState({layer1: color ? 'color'+color : 'color1'})"></b>
</div>
<div class="colors" [hidden]="layer1 && layer2 && layer3 && layer4 && layer5 && layer6 && layer7">
    <ul>
        <li class="btn-color-1"><span class="active" [class]="color == 1 || !color ? 'active' : '' " role="button" tabindex="1" on="tap:AMP.setState({color: 1})"></span></li>
        <li class="btn-color-2"><span [class]="color == 2 ? 'active' : '' " role="button" tabindex="1" on="tap:AMP.setState({color: 2})"></span></li>
        <li class="btn-color-3"><span [class]="color == 3 ? 'active' : '' " role="button" tabindex="1" on="tap:AMP.setState({color: 3})"></span></li>
        <li class="btn-color-4"><span [class]="color == 4 ? 'active' : '' " role="button" tabindex="1" on="tap:AMP.setState({color: 4})"></span></li>
    </ul>
</div>
<div class="message" hidden [hidden]="!layer1 || !layer2 || !layer3 || !layer4 || !layer5 || !layer6 || !layer7">
    <h2><b>Wow, this is just a masterpiece!</b>😍</h2>
</div>
The final game made with this code will look and work like this:
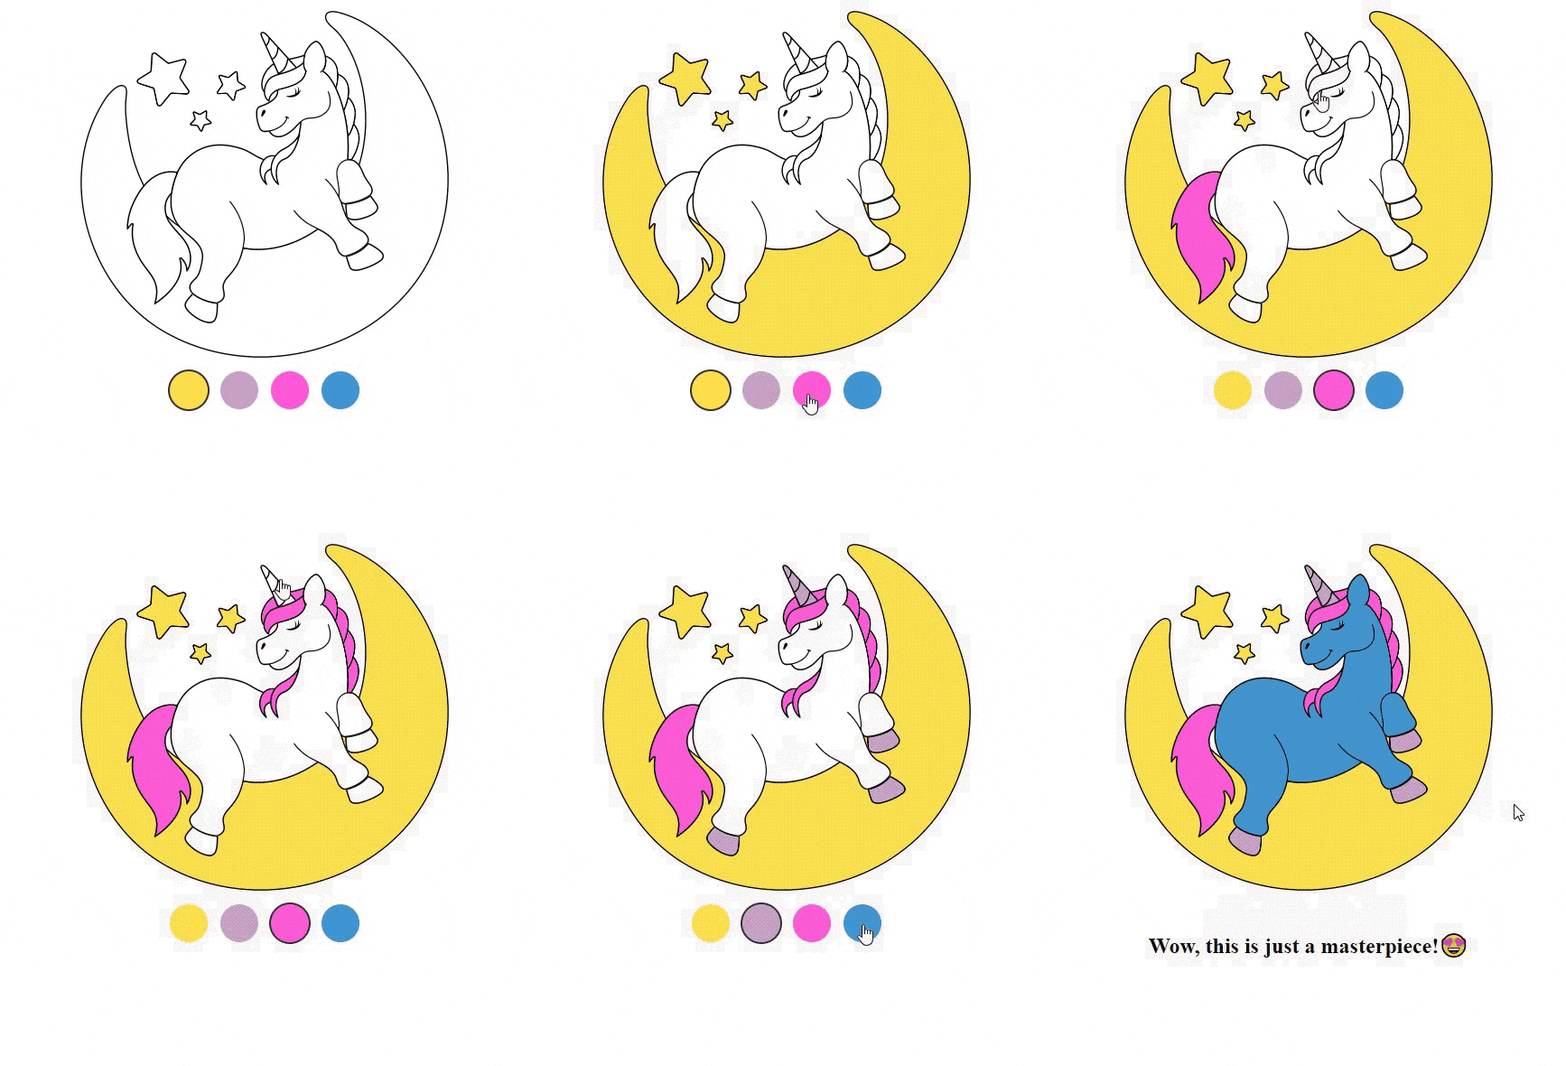
Use this code as you wish. Experiment with the game, pictures, styles, etc., to master these game mechanics and create a truly unique coloring game for your email campaign.
Wrapping up
As you can see, the game mechanics are quite interesting and unusual, but creating them entails a complex creation process requiring programming skills if you create the game from scratch.
We created this guide so that any marketer, regardless of their technical savvy, can recreate the mechanics and add the game to their email newsletters to surprise recipients and make email interactions more engaging.
In addition, our professional email programmers are always happy to help bring your custom AMP content ideas to life, elevating your email game to unprecedented heights.




2 comments